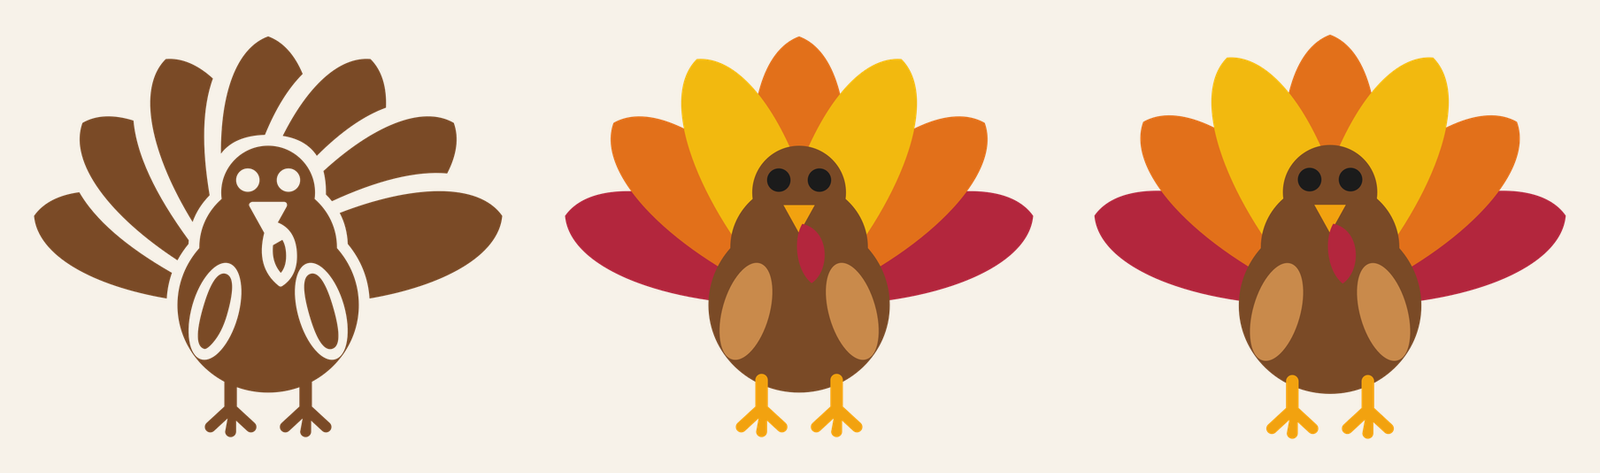
A round little turkey facing you head-on, seven tail feathers fanned out behind him. That’s the whole idea, and it’s why this file works on so many November projects: a vinyl decal on a glass door, a paper turkey for the classroom door, a kid’s shirt for the Thanksgiving table.
The download has three versions. The single-color turkey is 6.1 in wide for adhesive vinyl. The layered paper turkey is the same 6.1 in, built for cardstock in eight color layers. The layered shirt turkey is 9.1 in wide for iron-on (HTV), with the same eight layers.
| File | Size | Material | Layers | Check |
|---|---|---|---|---|
| Fan-tail turkey, single color (6 in) | 6.12 × 5.25 in | Vinyl | 1 layer | ✓ Cut-checked |
| Fan-tail turkey, layered paper (8 layers, 6 in) | 6.12 × 5.25 in | Cardstock | 8 layers | ✓ Cut-checked |
| Fan-tail turkey, layered HTV (9 in) | 9.12 × 7.88 in | HTV (iron-on) | 8 layers | ✓ Cut-checked |
Two ways the turkey is built
The single-color file reads as a turkey because of what’s missing. A narrow gap separates each feather from the next and runs around the body, so the fan stays readable even in one color. The eyes are holes. The beak and wattle are knocked out as a single outline, and each wing is an outlined oval.
Those outlines matter when you weed. The middle of each wing and the middle of the wattle are separate islands of vinyl, so there are 11 pieces in all: seven feathers, the body, two wing centers and the wattle center. Leave all of them on the backing and lift the design with transfer tape as one sheet. The file passed our adhesive vinyl check at 6.1 in (nothing thinner than 0.035 in, no gap too narrow to weed).
The layered files use full shapes that stack. The tail comes as three layers: red for the two outer feathers, orange for three, yellow for two. Each color’s feathers join at the base, hidden under the body, so each tail layer lifts off the mat as one piece and lines up without guesswork. On top of the tail go the body (head included), two tan wings, the golden-orange feet and beak, the red wattle and two black eyes.
Two layers share a color. The red feathers and the wattle are the same red, so Design Space puts them on the same mat, since it sorts mats by color. The paper file passed our cardstock check at 6.1 in and the HTV file passed the iron-on check at 9.1 in.
What you need
- Cutting machine and a standard grip mat (a light grip mat for thin cardstock)
- Permanent adhesive vinyl and transfer tape, for the single-color decal
- Cardstock in red, orange, yellow, golden orange, dark brown, tan and black, plus glue or foam adhesive, for the paper turkey
- Iron-on (HTV) in the same colors, a heat press, EasyPress or iron and a pressing sheet, for the shirt
- Weeding hook
How to make it
- Upload the file. In Design Space, choose Upload > Upload Image > Browse and pick the SVG. Layered SVGs come in already split into layers. Our upload guide walks through it. On Silhouette Studio you’ll need Designer Edition or higher for SVG, or use the DXF from the ZIP.
- Check the size. 6.1 in wide for the decal and the paper turkey, 9.1 in for the shirt. Keep the proportions locked if you change it.
- Pick your material and cut. Choose your material on the Make screen. For iron-on, Design Space turns on Mirror automatically; confirm the Mirror toggle on the Prepare screen and load the HTV shiny side down. Vinyl and cardstock aren’t mirrored.
- Weed or pop out the pieces. For the single-color decal, keep the wing and wattle centers in place. See how to weed vinyl if small pieces keep lifting.
- Assemble. Stack from the bottom: red feathers, orange, yellow, body, wings, feet and beak, wattle, eyes. For paper, glue each layer, or put foam dots under the body for some depth. For the shirt, press the layers in that order using the settings from the Cricut Heat Guide or your HTV maker.
Eight layers of iron-on is a lot. Cricut’s own layering instructions suggest keeping iron-on designs to four or fewer layers where you can, because each layer adds thickness and stiffness. Parts of this turkey stack several layers deep where the body sits over the tail. If you want a softer shirt, cut the single-color file in HTV instead and scale it up to 9 in: making it bigger only widens every gap and line.
Sizes for different items
| Item | File | Width |
|---|---|---|
| Window, glass door or large treat canister | Single color | 6.1 in and up |
| Paper turkey for a card front, door or bulletin board | Layered paper | 6.1 in and up |
| Adult or larger youth shirt | Layered shirt, or single color scaled up | 9.1 in |
| Tote bag | Layered shirt | 9.1 to 11 in |
| Wood sign | Single color | 6.1 in and up |
Scaling up is always safe. Going below 6.1 in is where trouble starts: the gaps between the feathers and the outlines around the wings get too narrow to weed cleanly, and the toes get thin. The layered HTV file was only checked at 9.1 in, so don’t shrink it for a toddler shirt. For small shirts, Little Turkey has a 4.6 in onesie version that was checked at that size.
Ideas beyond the obvious
A classroom turkey in paper. Cut several paper turkeys and let kids write one thing they’re thankful for on each feather before gluing. The yellow and orange feathers have the most writing room. For a bigger door turkey, scale the paper file up; once it outgrows a letter-size sheet you’ll need 12 x 12 cardstock.
One layer at a time. Short on a color? You don’t have to cut all eight layers in one go. Click the eye icon next to a layer in the Layers panel to hide it, and hidden layers won’t cut. That’s handy for recutting a single feather layer that tore, too.
The single color, not in brown. Cream or white vinyl on a dark stained board reads well from across a room, and so does black on a whitewashed one. Since the eyes and wing outlines are holes, whatever’s underneath shows through them, so pick a background that contrasts with the vinyl.
Pair it with the Gobble Gobble shirt, which uses this same turkey above the lettering, or the leaf place cards for the table.
If something goes wrong
On the single-color decal, the wing centers are the pieces most likely to come up with the background. Weed the background around the wings slowly, pulling toward the body rather than away from it, and press any stray piece back down right away.
On the paper turkey, if the feather layers don’t line up, check that you stacked them in order: red is at the bottom and is the widest spread of feathers, so it sets the position for everything above it.
Questions
How many layers is the layered turkey SVG?
Eight: three feather colors, the body, wings, feet and beak, wattle and eyes. The red feathers and wattle share a color, so they cut on the same mat.
Can I make the layered turkey in iron-on?
Yes, use the 9.1 in shirt file and press the layers bottom to top. For a lighter, softer shirt, cut the single-color file in HTV instead.
What’s the smallest size for the single-color turkey?
6.1 in wide, which is the size we checked it at. Below that, the gaps between the feathers can get too narrow to weed.
Can I sell items made with this turkey file?
Yes, up to 500 handmade items per design. You can’t share or sell the file itself. See the license page.