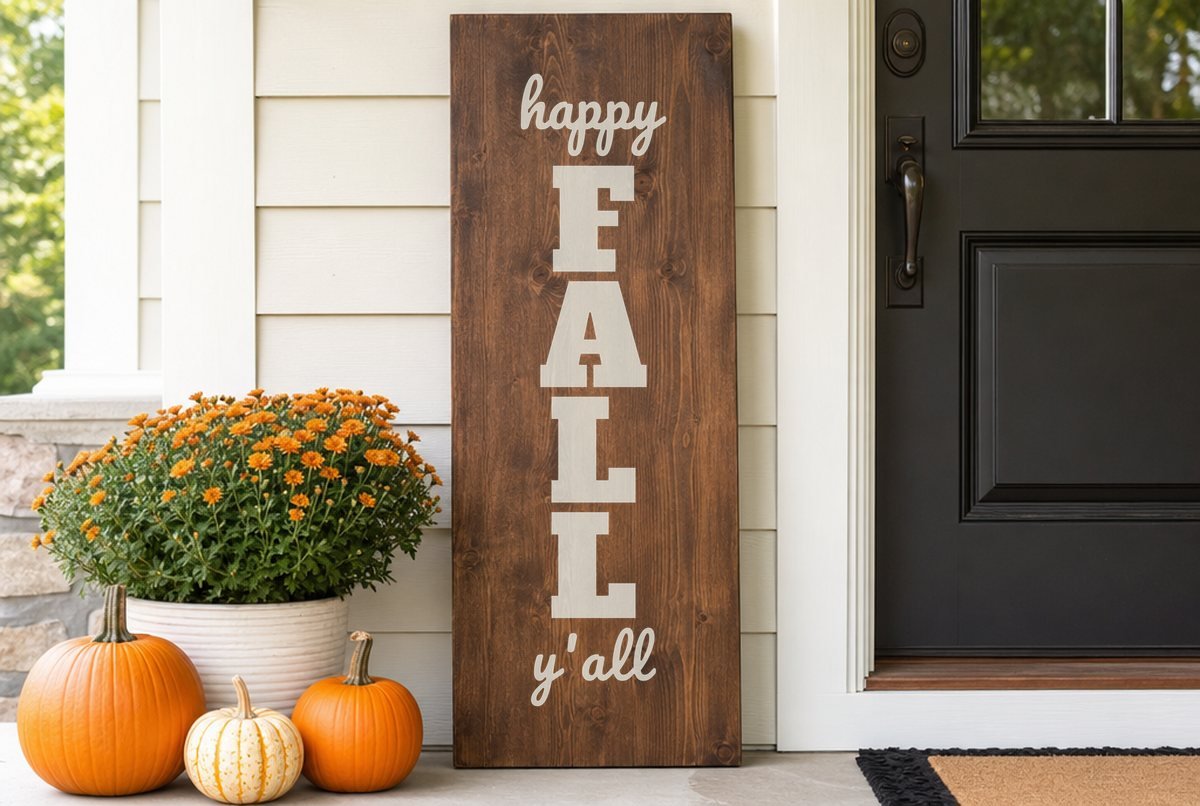
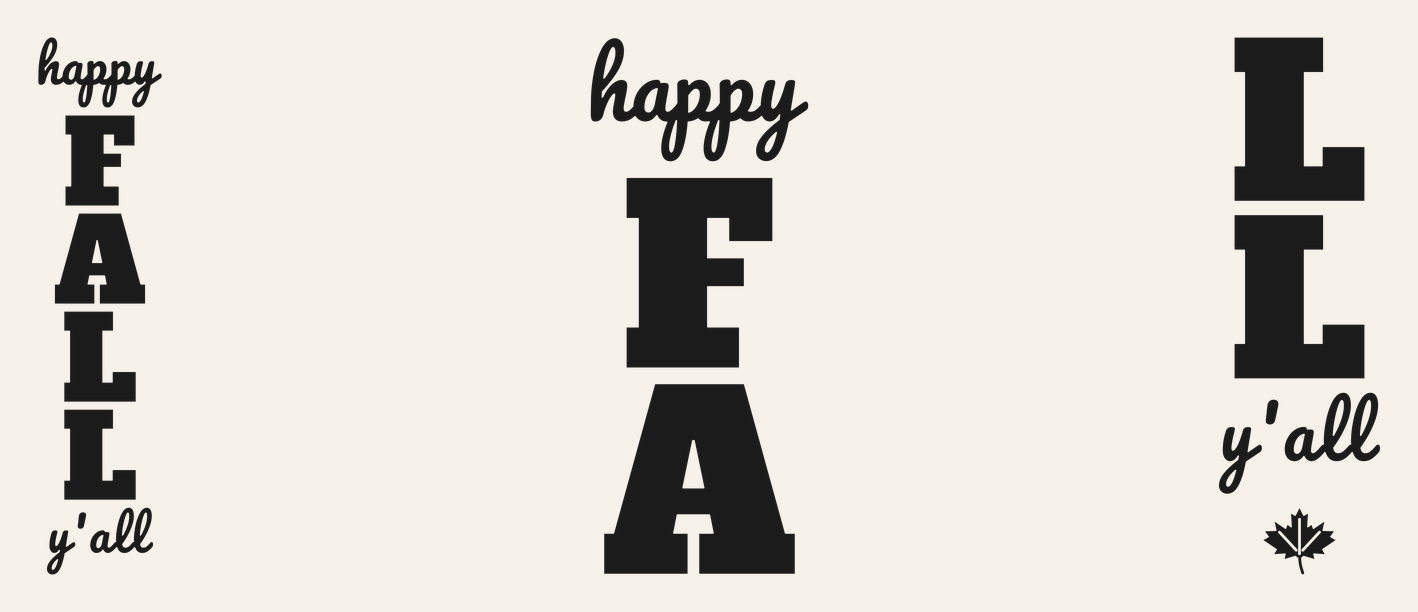
Tall porch leaner signs look simple until you try to fit one on a cutting mat. This Happy Fall Y’all SVG is laid out for a vertical board: “happy” in a relaxed script at the top, F-A-L-L stacked down the middle in big slab serif capitals, and “y’all” in script at the bottom. The larger version adds a small maple leaf under “y’all.”
It’s built as a paint stencil, not a vinyl decal, and comes in two sizes. The 4 ft version is 5.5 x 23.1 inches (the lettering itself is about 5.3 inches wide) and cuts on one 12×24 mat, for boards 5.5 to 7 inches wide. The 5 to 6 ft version is split across two 12×24 mats (8 x 19.38 and 6.88 x 22.5 inches) for a 1×10 board.
| File | Size | Material | Layers | Check |
|---|---|---|---|---|
| Happy Fall Y'all, 4 ft porch sign (one 12x24 mat) | 5.5 × 23.12 in | Stencil | 1 layer | ✓ Cut-checked |
| Happy Fall Y'all, 5-6 ft porch sign, mat 1 of 2 (happy F A) | 8 × 19.38 in | Stencil | 1 layer | ✓ Cut-checked |
| Happy Fall Y'all, 5-6 ft porch sign, mat 2 of 2 (L L y'all) | 6.88 × 22.5 in | Stencil | 1 layer | ✓ Cut-checked |
How the stencil files are laid out
A 12×24 mat can’t cut anything taller than about 24 inches, so a sign for a 5 or 6 foot board has to come in pieces. We split the big version at a natural break, between the A and the first L:
- Mat 1 of 2: “happy,” F and A (8 x 19.38 in)
- Mat 2 of 2: L, L, “y’all” and the maple leaf (6.88 x 22.5 in)
Each capital in the big version is about 6.8 inches tall, with about 0.6 inch of space between letters. Keep that number in mind; you’ll use it to join the two halves. In the 4 ft file the capitals are about 3.8 inches tall with roughly 0.35 inch between them.
All three files passed our cut check at their listed sizes for stencil material. With a stencil, you weed out the letters and keep everything else, so the check matters in reverse: the thin bits of stencil left between shapes have to survive weeding and stay put while you paint.
A few pieces of the stencil float free once the letters are weeded: the triangle inside the A, the insides of the closed loops in the script h and l’s, and the three thin veins in the maple leaf. Don’t throw them out. Transfer tape carries them to the board in the right spot, and without them those letters fill in as solid blobs.
What you need
- Wood board: 4 ft for the small file (5.5 to 7 in wide), or 5 to 6 ft 1×10 for the large one
- Adhesive stencil vinyl or stencil film, at least 12 x 24 in (two pieces for the large sign)
- 12×24 cutting mat (standard grip)
- Transfer tape
- Weeding hook and scraper
- Paint for the background and for the lettering (outdoor paint if it lives outside)
- Clear sealer, or a little of your background paint, to seal the stencil edges
- Stencil brush or foam pouncer
- Tape measure, long ruler or level, pencil
- Clear outdoor topcoat (optional)
Cutting the stencil
- Upload. In Cricut Design Space, click Upload, then Browse, and pick the 4 ft file or both 5 to 6 ft parts. Our upload guide walks through it.
- Don’t resize. These are sized to the board. The 4 ft file is already about as wide as a 1×6 board allows.
- Set the mat to 12×24. Click Make It. On the Prepare screen, open Material Size and choose the 12 x 24 in option. If you uploaded both large parts, each one gets its own mat.
- Cut. Pick the material setting that matches your stencil vinyl. Don’t mirror.
- Weed the letters out. This is the reverse of normal vinyl: remove the letter shapes and the leaf, and keep the background. Leave the A’s triangle, the script loops and the leaf veins on the liner. The weeding guide has tips for keeping small pieces in place.
Painting the board
- Prep the board. Sand, wipe off the dust, and paint or stain the background. Let it dry fully before any stencil touches it; stencil adhesive on soft paint can peel it up.
- Mark a center line. Measure the board’s width and draw a light pencil line down the middle, full length. Every letter centers on this line.
- Place mat 1. Cover the stencil with transfer tape, peel the backing, and lay it on the board with the letters centered on your pencil line. On a 5 ft board the full design is about 42 inches tall, so start “happy” roughly 9 inches from the top to center it (about 15 inches on a 6 ft board). Burnish hard, especially along every letter edge, then peel the transfer tape away.
- Place mat 2. Measure 0.6 inch below the bottom of the A and put the top of the first L there, centered on the same line. That keeps the spacing even across the join, and nobody can tell where one mat ended.
- Seal the edges. Brush a thin coat of clear sealer, or of your background color, over the open letter areas and let it dry. Any paint that seeps under the stencil edge is now clear or background-colored, so it doesn’t show. Cricut’s own stencil instructions suggest a sealant first on heavily textured surfaces, and rough wood grain can qualify.
- Paint the letters. Use a stencil brush or pouncer with very little paint, dabbing straight down instead of brushing toward the edges. Two or three thin coats beat one heavy coat.
- Peel. Pull the stencil off slowly, folding it back on itself. Touch up any small bleeds with a fine brush, and add a clear topcoat if the sign will sit outside.
Before painting, stand the board up and step back. A crooked letter is still fixable at this stage and very hard to fix after paint. Check the center line with a long ruler or a level against the edge of each capital.
Which file for which board
| Board | File | Design size |
|---|---|---|
| 4 ft, 1×6 (5.5 in actual width) | 4 ft sign | About 5.3 in of lettering, very small side margin |
| 4 ft, 1×8 (about 7.25 in actual) | 4 ft sign | About 5.3 in of lettering, comfortable margin |
| 5 ft, 1×10 (about 9.25 in actual) | 5 to 6 ft sign, both mats | About 7.9 in wide, 42 in tall |
| 6 ft, 1×10 | 5 to 6 ft sign, both mats | Same, with more room at top and bottom |
A “1×10” is narrower than 10 inches, so measure your board before you cut. On the 4 ft board, the design takes up about the top half, which leaves the lower part open where pumpkins or mums usually sit in front of a porch leaner.
Don’t shrink either version. The script’s loops and the gaps inside the leaf are the first parts to get too narrow, and in a stencil that means paint bridges where you didn’t want it.
Other finishes
White letters on a dark stained board, or black on a whitewashed one, both read from the street. You can also cut the 4 ft file in outdoor adhesive vinyl and apply it as a decal instead of painting, which skips the drying time. If you want a matching Thanksgiving sign later in the season, the Give Thanks sign SVG uses the same stencil approach, and Hello Fall works on a smaller door sign.
Stencil materials vary. Some are made to be reused and some are meant for one project, and they don’t all grip the same way. Follow the maker’s instructions for whichever you have, and test it on a scrap of your painted board first.
Questions
How do I cut a porch sign stencil taller than my mat?
Split the design across more than one mat. Our 5 to 6 ft file comes pre-split into two 12×24 pieces, breaking between the A and the first L, and you line them up on a pencil center line on the board.
How do I keep paint from bleeding under a stencil on wood?
Burnish the stencil edges well, then seal them with a thin coat of clear sealer or your background color before painting the letters. Use a dry brush with little paint and dab straight down.
What size board do I need for this sign?
The 4 ft file fits boards 5.5 to 7 inches wide. The 5 to 6 ft file is about 7.9 inches wide and 42 inches tall, sized for a 1×10 board.
Can I cut this without a 12×24 mat?
Not at these sizes. Every file is taller than 12 inches, so you need a 12×24 mat and a machine that accepts it.