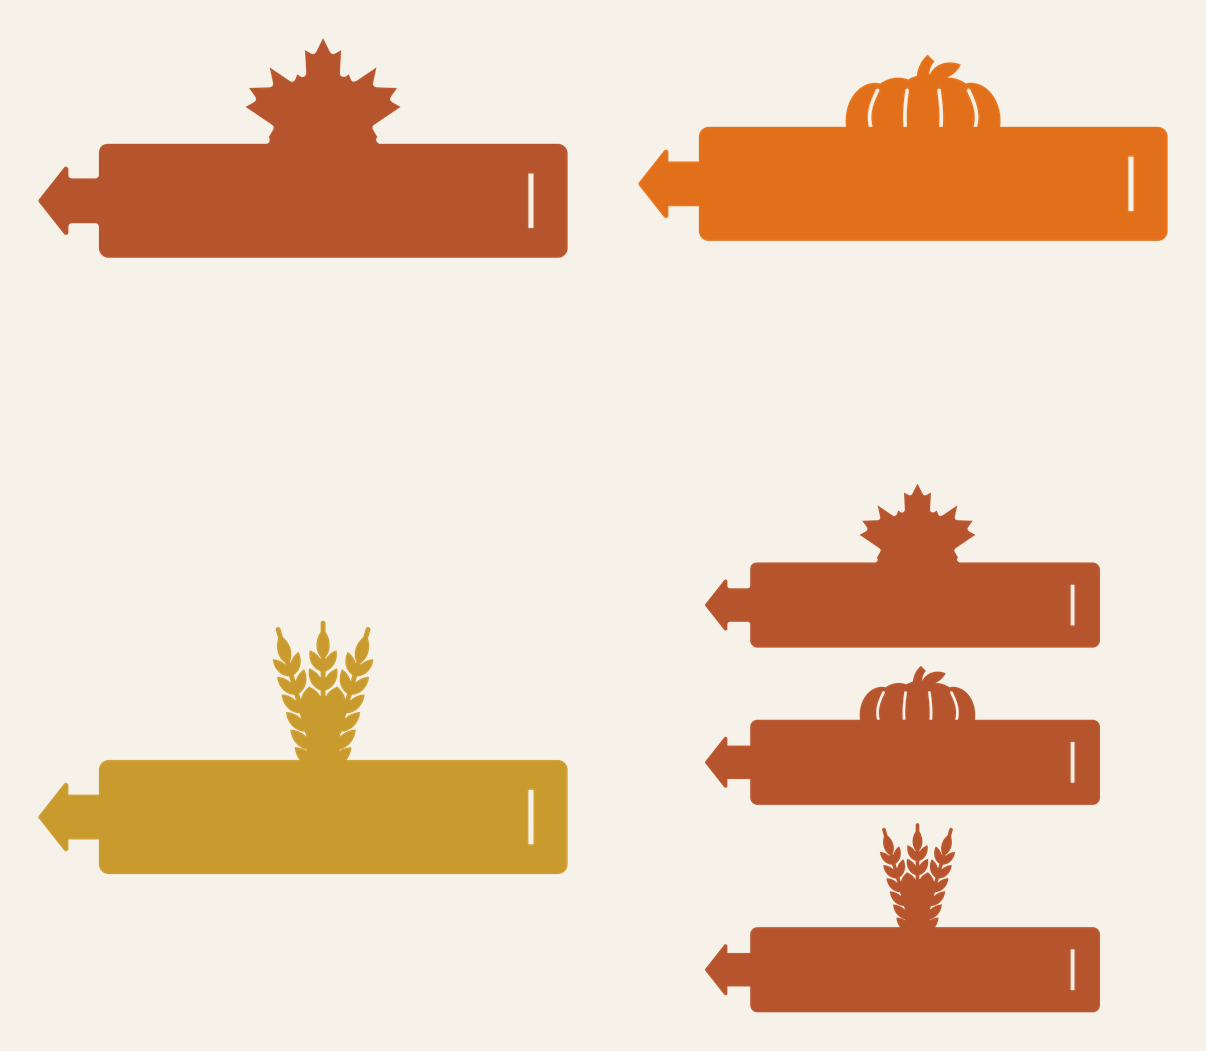
Paper napkin rings are one of the cheapest ways to dress up a Thanksgiving table, and they’re quick to cut: one strip of cardstock per seat, no glue, no tape. Each ring in this set is a band with a fall shape rising out of the top, a maple leaf, a pumpkin or a bundle of wheat. The band curls around a rolled napkin and locks closed with a tab that slides through a slot.
The band is 6.5 x 1.4 in, and the finished ring fits a cloth or paper napkin rolled to about 1.75 in across. There’s a file for each of the three rings, plus a sheet with all three that fits letter-size cardstock.
| File | Size | Material | Layers | Check |
|---|---|---|---|---|
| Napkin ring with maple leaf | 6.62 × 2.88 in | Cardstock | 1 layer | ✓ Cut-checked |
| Napkin ring with pumpkin | 6.62 × 2.5 in | Cardstock | 1 layer | ✓ Cut-checked |
| Napkin ring with wheat | 6.62 × 3.25 in | Cardstock | 1 layer | ✓ Cut-checked |
| All three napkin rings on one 12x12 mat | 6.62 × 8.88 in | Cardstock | 1 layer | ✓ Cut-checked |
How the ring locks
One end of the band is an arrow-shaped tab on a narrow neck. The other end has a slim upright slot. To close the ring, you pinch the arrow’s two wings toward each other, push the arrow through the slot and let go. The wings spring back open on the far side and hold the ring shut, and the neck sits in the slot so the ring doesn’t slide apart.
The slot is 1/16 in wide, the same width we use on our slot-together ornaments. That’s enough to cut cleanly through cardstock while staying snug on the neck. The topper sits near the middle of the visible front of the ring, so it faces the guest once the napkin is on the plate.
All four files passed our cut check for cardstock at full size. The tricky spots on a design like this are where the topper meets the top of the band. The maple’s lower points and the band edge can form narrow wedges, so we rounded those joins until no gap was too narrow to cut cleanly. The pumpkin keeps its four rib lines and the wheat keeps the gaps between its kernels, and both clear our cardstock minimums.
| File | Size | Topper |
|---|---|---|
| Maple ring | 6.62 x 2.88 in | Maple leaf, about 1.9 in across |
| Pumpkin ring | 6.62 x 2.5 in | Ribbed pumpkin with stem and leaf |
| Wheat ring | 6.62 x 3.25 in | Three wheat stalks fanned out |
| Three-up sheet | 6.62 x 8.88 in | One of each, fits 8.5 x 11 cardstock |
What you need
- Cutting machine and a standard grip mat
- Cardstock, 65 to 80 lb (heavier stock is harder to curl)
- Cloth or paper napkins
- Optional: a pencil or dowel to pre-curl the band
How to make them
- Upload the file. In Design Space, click Upload, then Browse, and choose the ring you want or the three-up sheet. Our upload guide shows each screen.
- Set how many you need. For a full table, duplicate a ring once per guest, or cut the three-up sheet several times for a mix. Keep the size as it is. A smaller ring won’t fit a napkin, and the slot and neck need to stay matched.
- Cut on cardstock. Choose the cardstock setting that matches your paper in the Make screen.
- Peel the mat away from the rings. Turn the mat face down and peel it back so the toppers stay flat. Push the slot’s sliver of paper out with a weeding hook if it stays in.
- Pre-curl the band. Roll each band around a pencil or a marker for a few seconds, with the topper on the outside. It closes much more easily once the paper has a curve.
- Close the ring around the napkin. Roll the napkin, wrap the band around it, pinch the arrow’s wings together and push the arrow through the slot from the inside. Let go and the wings open and lock.
Roll the napkin first and size the ring to it, not the other way around. A thick cloth napkin may need folding in thirds before you roll it so it stays under about 1.75 in across.
Making a full table
For eight guests, cutting the three-up sheet three times gives you nine rings with one spare, three of each design. Some tables look best with one design on every plate, and others mix all three. A simple rule: if your napkins are patterned, use one ring color; if they’re plain, mix three cardstock colors.
Colors that sit well together on a fall table: rust, mustard and cream; kraft with white napkins; or deep green with gold. Glitter cardstock cuts fine but is stiffer, so curl it longer before closing.
The rings pair naturally with the rest of a paper table set. Our Thanksgiving place cards use the same maple, oak and aspen shapes, and the thankful tree leaves make a centerpiece that guests can write on during dinner.
Adding a name
The band has plenty of room for a name to one side of the topper. Write it by hand after cutting, or, if your machine has a pen, add a text box in a single-line writing font, set it to draw and attach it to the band so it lands in place. Keep the name on the half of the band between the topper and the slot, since the tab end ends up tucked behind.
Troubleshooting
The arrow won’t go through the slot. Fold the wings in harder, nearly flat against each other, and feed the point in first. If the slot didn’t cut all the way through, the paper is heavier than the setting expects; use the next heavier cardstock setting.
The ring pops open. The wings didn’t open fully on the far side. Push the tab a little further through, until the narrow neck sits in the slot.
The topper droops. Lighter paper (under 65 lb) can’t hold the topper upright. Switch to heavier cardstock, or crease the band gently just below the topper so it stands straighter.
Questions
How do you make paper napkin rings with a Cricut?
Cut a strip of cardstock with a tab on one end and a slot on the other, curl it around a rolled napkin and push the tab through the slot. These files have the tab and slot built in.
What size should a napkin ring be?
Most napkins rolled up are about 1.5 to 2 in across. Our band is 6.5 in long, which closes to a ring that fits a napkin about 1.75 in across.
Do these napkin rings need glue?
No. The arrow tab locks through the slot. Glue is only needed if you add a name tag or other extra layers.