A pumpkin-shaped door hanger with Welcome across the middle is one of those fall projects you see on every other porch in October, and for good reason: it’s quick and it stays up until Thanksgiving. This download covers the two usual ways to make one.
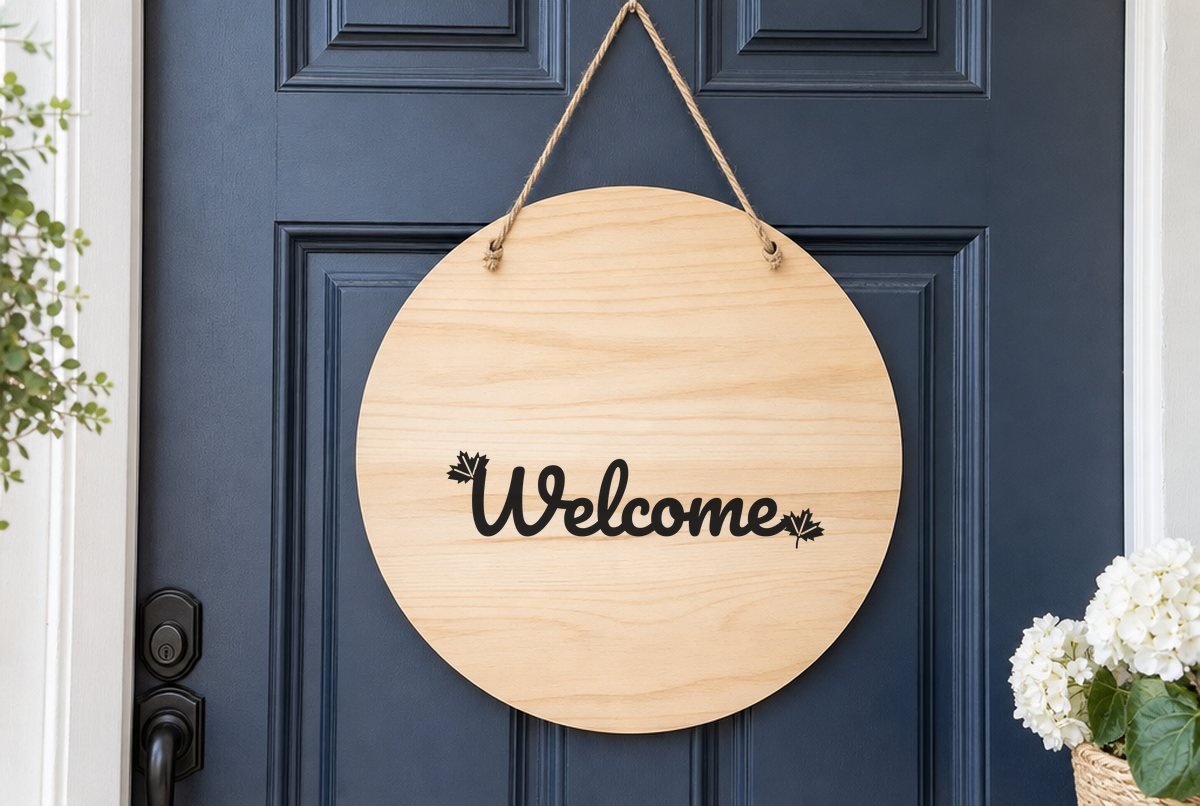
If you bought a wooden pumpkin blank, use the lettering file: Welcome in script with a small maple leaf at each end, 11.1 in wide, cut from adhesive vinyl. If you don’t have a blank, the other two files are the whole pumpkin at 11.1 x 8.1 in: a single-color vinyl version and a three-layer version built for cardstock.

| File | Size | Material | Layers | Check |
|---|---|---|---|---|
| Welcome lettering for an 18 in pumpkin door hanger | 11.12 × 3 in | Vinyl | 1 layer | ✓ Cut-checked |
| Welcome pumpkin door hanger, single color (11 in) | 11.12 × 8.12 in | Vinyl | 1 layer | ✓ Cut-checked |
| Welcome pumpkin door hanger, 3 layer (11 in) | 11.12 × 8.12 in | Cardstock | 3 layers | ✓ Cut-checked |
What each file is
Welcome lettering for a wooden blank. The word is Pacifico, a thick rounded script, and the two maple leaves are welded right onto the W and the final e. That makes the whole design a single piece: nothing to line up, nothing floating. The leaf veins and the letter loops are small holes you weed out. At 11.1 x 3.0 in, it’s sized to sit across the middle of an 18 to 20 in wooden pumpkin blank. Measure yours first, since blanks vary.
Single-color pumpkin. One orange pumpkin with Welcome cut out of it, four short rib lines cut out above and below the word (they stop clear of the letters), and the stem and leaf attached on top. Because the word is a knockout, the middles of the letters (inside the e’s and the o, for instance) are little islands of vinyl. Keep them on the backing; transfer tape carries them into place.
Three-layer pumpkin. An orange pumpkin base, a green stem and leaf, and a white top layer with Welcome and four rib segments. Stack them in that order. The rib segments stop short of the word so they don’t crowd it, which is why the top layer comes off the mat as five pieces: the word and four ribs.
The two vinyl files passed our adhesive vinyl check at 11.1 in, and the layered file passed our cardstock check, which asks for wider lines and bigger pieces than the vinyl check does. It was drawn to work as layered vinyl on a round board, too.
What you need
- Cutting machine and a standard grip mat (12 x 12)
- Permanent adhesive vinyl and transfer tape, for the lettering or the single-color pumpkin
- A wooden pumpkin blank or a round board, painted and fully dry
- 12 x 12 cardstock in orange, green and white, plus glue, for the paper version
- A stiff backing (chipboard or a thin wood round) and ribbon or twine to hang it
- Weeding hook and a scraper for burnishing
Making the wooden door hanger
- Prep the blank. Paint it and let the paint dry and cure as long as the paint maker says. Vinyl laid on soft or tacky paint can pull it up later.
- Upload and size. In Design Space choose Upload > Upload Image > Browse and pick the lettering file (see our upload guide). It opens at 11.1 in wide. Measure the flat middle of your blank. On a bigger blank you can scale up freely; on a smaller one, don’t shrink it below 11.1 in, because the leaf veins are the first thing to get too fine.
- Cut and weed. Pick your vinyl on the Make screen; adhesive vinyl isn’t mirrored. Weed the background, then the letter loops and the vein slits in the leaves.
- Transfer. Cover the design with transfer tape and burnish well, especially over the leaves. Use a strip of painter’s tape as a hinge across the middle to center it on the blank, then peel and apply one half at a time. Our transfer tape guide covers the hinge method.
- Burnish and peel. Rub the vinyl down onto the wood grain firmly and peel the tape back flat against itself. Add a ribbon or twine hanger if the blank didn’t come with one.
Painted wood has texture, and script letters have thin exit strokes. If a stroke won’t let go of the transfer tape, lay the tape back down, burnish that spot again and peel more slowly at a sharper angle. A lower-grip transfer tape helps on painted surfaces.
Making the paper door hanger
The layered file is 11.1 in wide, which is a little wider than a letter-size sheet, so use 12 x 12 cardstock. Cut the three layers (Design Space puts each color on its own mat), glue the stem and leaf over the top edge of the pumpkin where the base of the stem overlaps it, then glue the white layer on top. Line up the white ribs with the lobes of the pumpkin; Welcome sits a little below center. Our guide to cutting cardstock cleanly helps if the script edges tear, and layered paper crafts covers glue and foam dots.
Paper won’t survive an outside door, so glue the finished pumpkin to chipboard or a thin wood round and keep it for an inside door, a classroom or a covered spot. It’s also a good fit for a bulletin board.
Sizes for different uses
| Project | File | Width |
|---|---|---|
| 18 to 20 in wooden pumpkin blank | Welcome lettering | 11.1 in (check your blank) |
| Larger pumpkin blank, 22 in and up | Welcome lettering | 12 to 14 in |
| 12 in or larger round board | Single color or layered, in vinyl | 11.1 in |
| Glass storm door or window | Single color | 11.1 in and up |
| Paper door hanger or classroom door | Three layer | 11.1 in |
Anything bigger than the listed size will cut fine. Smaller is where the knockout letters and the leaf veins start closing up, so treat 11.1 in as the floor for all three files. Once a design gets wider than your 12 x 12 mat’s cut area (a bit under 12 in), you’ll need a 12 x 24 mat and material to match.
Two variations
Layered vinyl on a round. Cut the three-layer file from adhesive vinyl instead of paper and stack it on a painted round, orange first. The white layer goes on last; our guide to layering adhesive vinyl explains how to line up each color.
Change the colors. A white pumpkin with a sage stem, or a cream pumpkin with black lettering, suits a farmhouse porch. Just swap the vinyl or cardstock; the file doesn’t change. The lettering file in black on a white-painted blank is a clean look too, and it matches our Happy Fall Y’all porch sign. For more pumpkin shapes, see the free pumpkin SVGs.
Questions
What size lettering goes on an 18 in pumpkin door hanger?
Our Welcome lettering file is 11.1 in wide and 3 in tall, made to sit across the middle of an 18 to 20 in wooden pumpkin blank. Measure your blank’s flat center first.
Do I need a wooden blank?
No. The single-color and three-layer files are the whole pumpkin shape, 11.1 x 8.1 in, for vinyl on a board or door, or layered cardstock.
What paper size do I need for the layered version?
12 x 12 cardstock. The pumpkin is 11.1 in wide, a little wider than a letter-size sheet.
Can I sell door hangers made with this file?
Yes, up to 500 handmade items per design, but not the digital file. See the license page.