The Cricut Makerspace Guide
Everything a library or school makerspace needs to run a Cricut cutting machine: which settings to pick for 25 common materials on every current model, a Design Space cheat sheet, a first project for new users, free test-cut files, and fixes for the problems that come up at the machine.
- No ads, no sign-up. Nothing to buy on this page.
- Checked against Cricut’s help center on October 1, 2026
- Independent guide, not made by Cricut

Which machine do you have?
Cricut sells three families of cutting machines, and the family decides which blades, mats and materials you can use. If you aren’t sure which model you have, check the label underneath the machine or the machine list in Design Space. The one detail that changes a lot day to day: the Explore Air 2 and older have a Smart Set dial on top. Every newer model sets the material on screen.
Swipe the table sideways to see every column →
| Machine | Where you pick the material | Mats | Smart Materials (no mat) | Blades and tools | Thickest material Cricut lists |
|---|---|---|---|---|---|
| Joy / Joy 2 | Design Space only | 4.5 in wide (4.5 × 6.5 and 4.5 × 12 in); Light and Standard grip | Yes: one shape up to 4 ft, repeats up to 20 ft | Joy Blade (Joy) or Premium Fine-Point Cutting Tool (Joy 2), pens, Foil Transfer Tool; Joy 2 adds a Scoring Tool | 1.65 mm (Joy 2) |
| Joy Xtra | Design Space only | 8.5 × 12 in; Light and Standard grip, Card Mat | Yes | Joy Blade, pens, Foil Transfer Tool | Not stated |
| Explore Air 2 and older | Smart Set dial on the machine; Custom = choose in Design Space | 12 × 12 and 12 × 24 in; all four grips | No | Fine-Point, Deep-Point and Bonded-Fabric blades, Scoring Stylus, Foil Transfer Tool, pens | 2.0 mm |
| Explore 3 / Explore 4 | Design Space | 12 × 12 and 12 × 24 in; all four grips | Yes: up to 11.7 in wide, 12 ft long | Same as Explore Air 2, plus Roll Holder | 2.0 mm |
| Explore 5 | Design Space | 12 × 12 and 12 × 24 in; all four grips, Card Mats | Yes | One-piece Premium Fine-Point and Deep Cutting Tools, Scoring Tool, Foil Transfer Tool; older blade housings also fit | 2.0 mm |
| Maker (original) | Design Space | 12 × 12 and 12 × 24 in; all four grips | No | Everything Explore uses, plus Rotary Blade, Knife Blade and QuickSwap tips (scoring wheel, deboss, engrave, perforation, wavy) | 2.4 mm |
| Maker 3 / Maker 4 | Design Space | 12 × 12 and 12 × 24 in; all four grips | Yes: up to 11.7 in wide, 12 ft long | Same as Maker, plus Roll Holder | 2.4 mm |
| Maker 5 | Design Space | 12 × 12 and 12 × 24 in; all four grips, Card Mats | Yes | Same as Maker, plus one-piece cutting, deep cutting, scoring and engraving tools | Some materials up to 1/8 in (3 mm) |
Sources: Cricut, All About Cricut Blades and Machine Tools, Which mats can I use with my Cricut machine?, All About Smart Materials, Which materials can I cut (thickness notes), Cricut Maker 5 compatible tools. Knife Blade and Rotary Blade work in Maker machines only (Cricut).
Materials and settings chart
Each row is a material a makerspace is likely to stock. “Pick in Design Space” is the setting name to search for under Browse All Materials (on a phone or tablet, All Materials). Every row was checked against Cricut’s own published material lists for each machine, and each note links to the Cricut instructions it comes from.
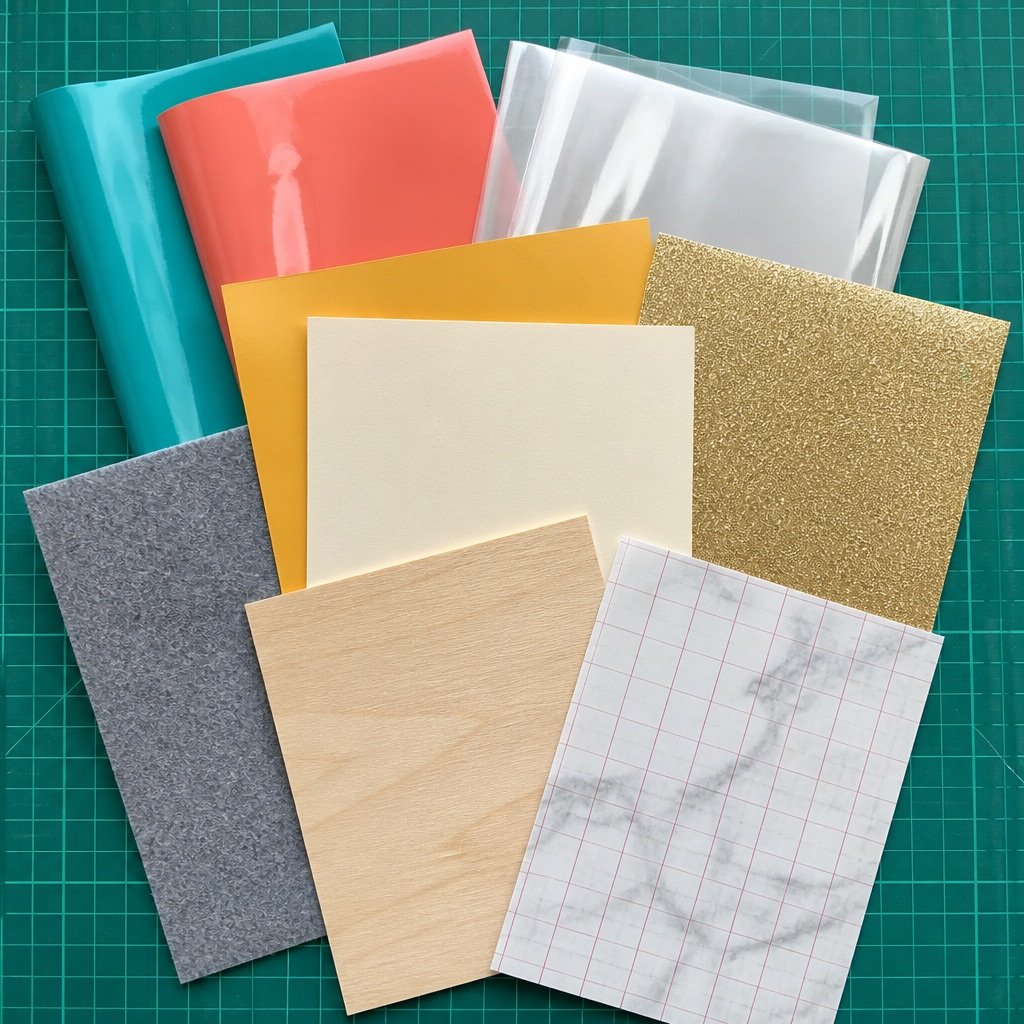
Three rules cover most of it. Vinyl and iron-on go liner side down. Iron-on and Infusible Ink need Mirror turned on. And before a class, cut a 1 in test star on every new roll or brand; settings are a starting point, not a promise. Cricut says the same thing in nearly every material guide.
Cricut materials & settings chart
Swipe the table sideways to see every column →
| Material | Pick in Design Space | Blade / tool | Mat | Mirror? | Maker | Explore | Joy | Explore Air 2 dial | Notes |
|---|---|---|---|---|---|---|---|---|---|
| Permanent adhesive vinyl | Premium Vinyl – Permanent | Fine-Point | Standard | No | Maker: Listed for every Maker model | Explore: Listed for every Explore model | Joy: Listed for every Joy model | Custom¹ or Vinyl | Liner side down. Apply with transfer tape. src |
| Removable adhesive vinyl | Premium Vinyl – Removable | Fine-Point | Standard | No | Maker: Listed for Maker 5, Maker 3/Maker 4 | Explore: Listed for Explore 3/Explore 4 | Joy: Listed for Joy 2, Joy Xtra | Custom¹ or Vinyl | For walls, windows and anything borrowed. src |
| Smart Vinyl (no mat) | Smart Vinyl – Permanent | Fine-Point | No mat | No | Maker: Listed for Maker 5, Maker 3/Maker 4 | Explore: Listed for Explore 5, Explore 3/Explore 4 | Joy: Listed for every Joy model | Not supported | Pieces shorter than 6 in (4 in on Joy and Joy 2) go on a mat. src |
| Iron-on / HTV (Everyday Iron-On) | Everyday Iron-On | Fine-Point | Standard | Yes | Maker: Listed for every Maker model | Explore: Listed for every Explore model | Joy: Listed for every Joy model | Custom¹ or Iron-On | Shiny liner side down. Press with the Cricut Heat Guide settings. src |
| Glitter iron-on | Glitter Iron-On | Fine-Point | Standard | Yes | Maker: Listed for every Maker model | Explore: Listed for every Explore model | Joy: Listed for every Joy model | Custom¹ | Shiny liner side down. src |
| Smart Iron-On (no mat) | Smart Iron-On | Fine-Point | No mat | Yes | Maker: Listed for Maker 5, Maker 3/Maker 4 | Explore: Listed for Explore 5, Explore 3/Explore 4 | Joy: Listed for every Joy model | Not supported | Same machines as Smart Vinyl. src |
| Infusible Ink Transfer Sheet | Infusible Ink Transfer Sheet | Fine-Point | Standard | Yes | Maker: Listed for every Maker model | Explore: Listed for every Explore model | Joy: Listed for every Joy model | Custom¹ | Liner side down. Weed by hand or tweezers. Needs Infusible Ink compatible blanks. src |
| Copy / printer paper | Copy Paper | Fine-Point | Light | No | Maker: Listed for every Maker model | Explore: Listed for every Explore model | Joy: Listed for every Joy model | Paper | Joy and Joy Xtra list it as Laser Copy Paper. src |
| Light cardstock (60-65 lb) | Light Cardstock – 65 lb (176 gsm) | Fine-Point | Light | No | Maker: Listed for every Maker model | Explore: Listed for every Explore model | Joy: Listed for Joy Xtra, Joy | Light Cardstock | src |
| Medium cardstock (80 lb) | Medium Cardstock – 80 lb (216 gsm) | Fine-Point | Standard | No | Maker: Listed for every Maker model | Explore: Listed for every Explore model | Joy: Listed for every Joy model | Cardstock | Cuts twice on Maker 5, Explore 5 and Joy 2. A single-pass version exists for simple shapes. src |
| Heavy cardstock (100 lb) | Heavy Cardstock – 100 lb (270 gsm) | Fine-Point | Strong | No | Maker: Listed for every Maker model | Explore: Listed for every Explore model | Joy: Listed for every Joy model | Custom¹ | Joy mats are Light or Standard only: use Standard. src |
| Glitter cardstock | Glitter Cardstock | Fine-Point | Light or Strong² | No | Maker: Listed for every Maker model | Explore: Listed for every Explore model | Joy: Listed for every Joy model | Custom¹ | Two passes on every machine. src |
| Poster board | Poster Board | Fine-Point | Strong | No | Maker: Listed for every Maker model | Explore: Listed for Explore Air 2 | Joy: Not listed | Poster Board | Other Explore and Joy models list foil or metallic poster board instead. src |
| Kraft board | Kraft Board | Fine-Point | Light | No | Maker: Listed for every Maker model | Explore: Listed for every Explore model | Joy: Not listed | Custom¹ | Two or three passes. src |
| Vellum | Vellum | Fine-Point | Light | No | Maker: Listed for every Maker model | Explore: Listed for every Explore model | Joy: Listed for Joy 2 | Custom¹ | src |
| Printable sticker paper (Print Then Cut) | Printable Sticker Paper (your type) | Fine-Point | Light | No | Maker: Listed for every Maker model | Explore: Listed for every Explore model | Joy: Listed for Joy 2, Joy Xtra | Custom¹ | Print Then Cut. Place the sheet exactly as the screen shows. src |
| Window cling | Window Cling | Fine-Point | Standard | If needed | Maker: Listed for every Maker model | Explore: Listed for Explore 3/Explore 4, Explore Air 2 | Joy: Listed for Joy | Custom¹ | Mirror it if it will be read through glass. Kiss cut: the liner stays whole. src |
| Stencil film | Flexible Stencil Film | Fine-Point | Standard or Light | No | Maker: Listed for every Maker model | Explore: Listed for Explore 3/Explore 4, Explore Air 2 | Joy: Listed for Joy Xtra, Joy | Custom¹ | Named Flexible Stencil Film, Stencil Film or Stencil Vinyl. src |
| Craft foam (2 mm) | Craft Foam | Deep-Point | Strong | No | Maker: Listed for every Maker model | Explore: Listed for every Explore model | Joy: Not listed | Custom¹ | Skip intricate shapes under 2 × 2 in. src |
| Faux leather (paper thin) | Faux Leather (Paper Thin) | Fine-Point | Strong, face down | No | Maker: Listed for every Maker model | Explore: Listed for every Explore model | Joy: Listed for Joy 2, Joy | Custom¹ | Move the star wheels all the way to the right. src |
| Felt | Felt | Fine-Point | Per Design Space | No | Maker: Listed for every Maker model | Explore: Listed for every Explore model | Joy: Not listed | Custom¹ | Most Explore models list wool felt rather than craft felt. src |
| Cotton fabric (unbonded) | Cotton | Rotary | Fabric Grip | No | Maker: Listed for every Maker model | Explore: Not listed | Joy: Not listed | Not supported | Maker machines only. No stabilizer needed. src |
| Cotton fabric, bonded to a stabilizer | Cotton, Bonded | Bonded-Fabric | Fabric Grip | No | Maker: Listed for every Maker model | Explore: Listed for Explore 5, Explore Air 2 | Joy: Not listed | Fabric | Iron a stabilizer to the back first. src |
| Chipboard, 2 mm | Heavy Chipboard – 2.0mm | Knife | Strong + tape | No | Maker: Listed for every Maker model | Explore: Not listed | Joy: Not listed | Not supported | Maker machines only. Keep cuts ¼ in from the edge. src |
| Basswood, 1/16 in | Basswood – 1/16" (1.6 mm) | Knife | Strong + tape | Yes³ | Maker: Listed for every Maker model | Explore: Not listed | Joy: Not listed | Not supported | Maker machines only. Keep cuts ¼ in from the edge. src |
on Cricut’s list for every model in that family some models (see the exact-settings lookup) not on Cricut’s list. Mats: Light blue, Standard green, Strong purple, Fabric Grip pink. Joy mats come in Light and Standard only.
¹ Cricut’s instructions for its own materials say to turn the Smart Set dial to Custom and pick the material by name in Design Space. The printed dial positions (Paper, Vinyl, Iron-On, Light Cardstock, Cardstock, Fabric, Poster Board, plus a “+” half step for a little more pressure) are starting points for plain, non-Cricut stock. ² Cricut’s glitter cardstock instructions say Light Grip; its general cardstock instructions say Strong Grip for glitter cardstock. Test on a scrap. ³ Cricut’s basswood steps say to mirror the image.
Setting names vary slightly by machine (for example “Premium Vinyl – Permanent Glossy” on Maker 3/4 and Explore 3/4). Design Space sets pressure and passes for you. Always cut a small test shape on new material first. Independent guide, not affiliated with Cricut. Cricut and Design Space are trademarks of Cricut, Inc.
Exact settings for your machine
Design Space fills in pressure and the number of passes (multi-cut) for you. You only need the numbers below when you edit a custom material or a cut keeps coming out shallow. Pick your machine to see Cricut’s exact setting name, blade, pressure and passes for each material in the chart.
Swipe the table sideways to see every column →
| Material | Cricut setting name | Blade / tool | Pressure | Passes |
|---|---|---|---|---|
| Turn on JavaScript to use the lookup, or see Cricut’s list linked below. | ||||
Data: Cricut, Which materials can I cut with my Cricut smart cutting machine?, copied October 1, 2026. Cricut adds and retunes settings over time; if a number here and Design Space disagree, trust Design Space. A dash means the material isn’t on that machine’s list (Cricut says you can still test-cut a similar setting if the material is thin enough).
Iron-on and Infusible Ink: pressing
Cutting is the same for both. Pressing is where they differ, and where most failed projects come from. Cricut’s position is plain: time, temperature and pressure depend on the material, the blank and the press, so look each project up in the Cricut Heat Guide (or the Cricut Heat app for EasyPress 3 and the Hat Press). Print the guide’s result for the materials you stock and keep it with the press.
Iron-on (HTV)
- Mirror on, shiny liner side down, Standard Grip mat.
- Weed the background; the design stays on the clear liner.
- Pre-wash fabric without softener. Press on a firm, waist-high surface, not an ironing board.
- Preheat the blank, place the design liner side up, press as the Heat Guide says.
- Peel the liner hot, warm or cool, as the guide says for that material.
- Wait 24 hours before washing. Wash and dry inside out, no bleach.
No press? For Everyday Iron-On, Cricut’s instructions allow a household iron: Cotton/Linen setting, steam off, preheat the fabric 10-15 seconds, then medium pressure for 25-30 seconds on the front and 25-30 on the back. Peel when cool. Source: Cricut Everyday Iron-On.
Infusible Ink
- Dry hands, no lotion. Mirror on, liner side down, Standard Grip mat.
- Roll the cut sheet gently to “crack” the cuts, then weed with fingers or tweezers.
- Use an Infusible Ink compatible blank. Cricut says fabric needs at least 75% polyester; the ink won’t transfer to 100% cotton.
- Design face down, clear liner on top, cardstock inside the blank, butcher paper over it.
- Press per the Heat Guide. Let it cool, then lift the liner.
- Stray bits: tweezers, not fingers. New butcher paper every time.
Sources: How to use Infusible Ink, Infusible Ink FAQ.
Settings vary by brand, vinyl type and fabric. Don’t borrow numbers from a video or another product; a wrong guess shows up as peeling after the first wash. Our first-shirt walkthrough covers the whole process with a free practice file.
Design Space quick reference
Design Space is Cricut’s free app for Windows, Mac, iPhone, iPad and Android. You need a free Cricut account, and machines are set up through it. Patrons using shared makerspace computers should sign in with the makerspace account, not their own.
Upload
Brings in your own files. Design Space accepts .svg, .dxf, .png, .jpg, .gif and .bmp. Use SVG or DXF for clean cut lines. src
Make
Sends the project to the machine and shows each mat. Older versions call it Make It. Mirror and material selection happen here. src
Operation
What the machine does to a layer: Cut, Draw, Score, Engrave, Deboss, Perf or Wavy. Older guides call this Linetype. src
Attach
Keeps pieces in the same spots on the mat as on the Canvas, and fastens a Draw or Score layer to the shape it belongs on. src
Group
Moves and sizes layers together on screen. Does not change how they cut or where they land on the mat. src
Weld
Permanently joins overlapping shapes into one outline, so script letters cut as one piece. Can’t be undone later. src
Combine
Unite, Subtract, Intersect and Exclude. Like Weld and Slice, but the pieces stay editable until you choose Merge Layers. src
Slice
Cuts one shape out of another and leaves the pieces as separate layers. src
Flatten
Merges layers into one printable image for Print Then Cut. src
Contour
Hides or shows individual cut lines on a layer, for example the inside of a letter. src
Offset
Adds an outline layer larger or smaller than your shape, for sticker borders and layered designs. src
Mirror
Flips a mat before cutting. Required for iron-on and Infusible Ink. Set it per mat on the Make screen. src
System requirements (checked October 1, 2026)
| Device | Minimum | Offline use |
|---|---|---|
| Windows | Windows 10 or later, dual-core CPU, 4 GB RAM, 2 GB free disk, USB or Bluetooth, 1024 × 768 screen. S Mode not supported. | Yes, desktop app |
| Mac | macOS 12 or later, 1.83 GHz CPU, 4 GB RAM, 2 GB free disk, USB or Bluetooth, 1024 × 768 screen | Yes, desktop app |
| iPhone / iPad | iOS / iPadOS 17 or later | Yes |
| Android | Android 11 or later, phones and tablets only | No |
| Chromebook, Linux | Not supported | |
All need broadband (about 2-3 Mbps down, 1-2 Mbps up). Source: System Requirements – Design Space. Cricut changes these as operating systems age, so check before buying a computer for the station.
Uploading your own file? Our step-by-step guide to uploading an SVG to Design Space walks through it, and what an SVG file is explains why cut files come as SVG.
First project: a 3 in vinyl star decal
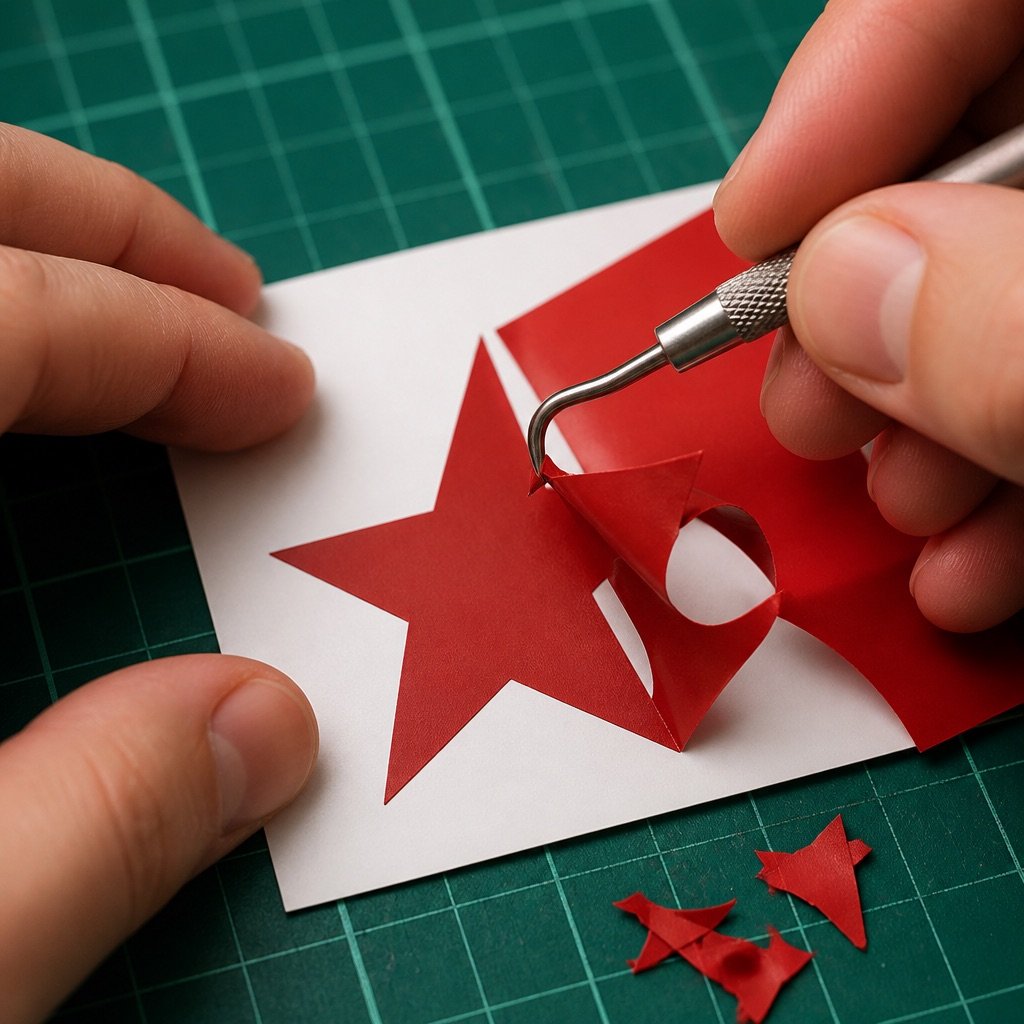
This is the orientation project we’d hand a new patron: one shape, one color, nothing to weed inside, and it ends with something to stick on a notebook. It takes about 15 minutes and uses a scrap.
What you need
- A 4 × 4 in piece of permanent adhesive vinyl
- Standard Grip (green) mat
- A piece of transfer tape, a weeding hook and a scraper
- The free practice-star.svg file

- Upload the star. In Design Space choose New Project, then Upload, then select practice-star.svg. Add it to the Canvas. It opens at 3.12 × 3 in; leave it.
- Click Make. Check the mat preview shows one star. Leave Mirror off: this is adhesive vinyl, not iron-on.
- Pick the material. Search for the vinyl setting for your machine (see the chart). Explore Air 2: turn the dial to Vinyl, or to Custom and choose the setting by name.
- Load the vinyl. Colored side up, liner side down, in the top-left corner of the mat grid. Smooth it flat with the scraper.
- Cut. Load the mat, press Go, and keep hands clear until it finishes. Unload.
- Weed. Peel the vinyl around the star off the liner, starting at a corner. The star stays behind. More help in how to weed vinyl.
- Transfer. Lay transfer tape over the star, rub it with the scraper, peel the liner away, place the star, rub again, and peel the tape back at a low angle. Step by step: how to use transfer tape.
Ready for the next step? The first Cricut shirt guide teaches mirror, iron-on and pressing with a 9 in practice design. Not sure which vinyl to buy for the station? See permanent vs. removable vinyl.
The makerspace test-cut pack
Eight cut files from our library, chosen for checking a machine, a blade or a new material before a class, plus a README with the order to use them in. Each file comes as SVG for Design Space, DXF for other cutting software, and PNG. Each one was checked by our software at its download size for pieces too thin or too small to cut and weed. Those are software checks (how we make and check files), so still cut a test on your own machine.
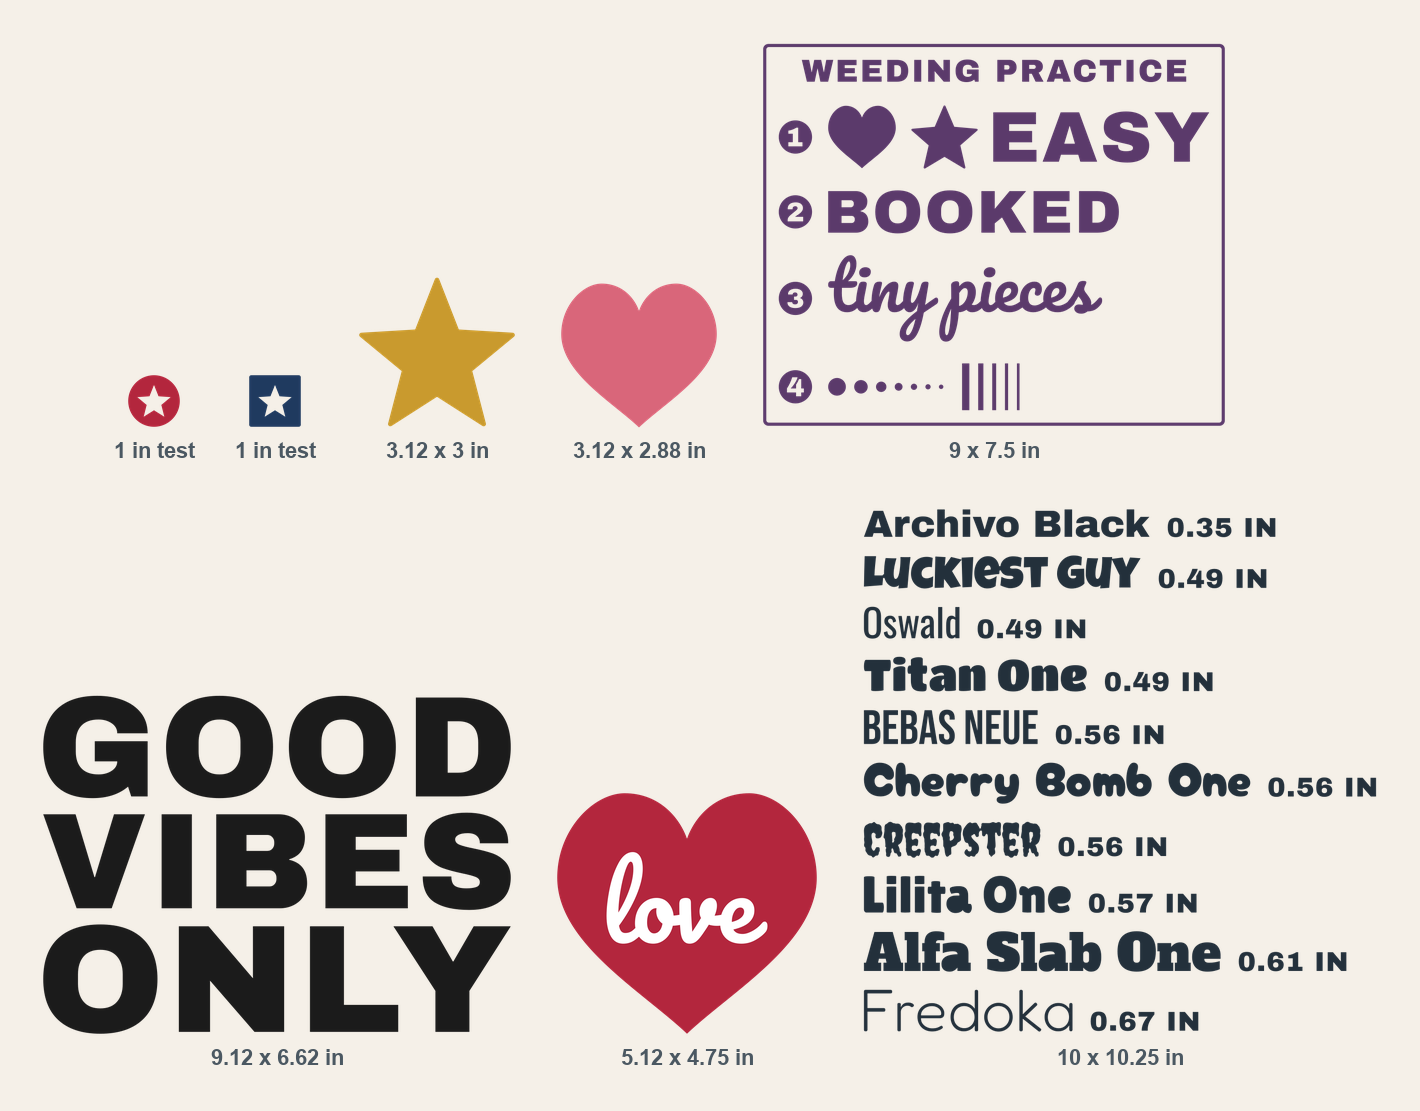
| File | Size | Material | Layers | Check |
|---|---|---|---|---|
| Test cut — star in circle (1 in) | 1.12 × 1.12 in | Vinyl | 1 layer | ✓ Cut-checked |
| Test cut — star in square (1 in) | 1.12 × 1.12 in | Vinyl | 1 layer | ✓ Cut-checked |
| Practice star | 3.12 × 3 in | Vinyl | 1 layer | ✓ Cut-checked |
| Practice heart | 3.12 × 2.88 in | Vinyl | 1 layer | ✓ Cut-checked |
| Weeding practice — four levels | 9 × 7.5 in | Vinyl | 1 layer | ✓ Cut-checked |
| Good Vibes Only — first shirt | 9.12 × 6.62 in | HTV (iron-on) | 1 layer | ✓ Cut-checked |
| Love heart — 2-layer HTV practice | 5.12 × 4.75 in | HTV (iron-on) | 2 layers | ✓ Cut-checked |
| Font test sheet 1 | 10 × 10.25 in | Vinyl | 1 layer | ✓ Cut-checked |
Download single files
Swipe the table sideways to see every column →
| File | Use it for | Download |
|---|---|---|
| 1 in test star (circle) | Any new material. Cut, weed the star, check the edges. | SVG DXF PNG |
| 1 in test star (square) | Same check, with straight edges and corners. | SVG DXF PNG |
| 3 in star | A patron's first cut. Nothing to weed inside. | SVG DXF PNG |
| 3 in heart | Same, with curves. | SVG DXF PNG |
| Weeding practice, 4 levels | Shows how fine a detail your vinyl and blade can hold. | SVG DXF PNG |
| 2-layer iron-on heart | Mirror on. Layering practice for iron-on. | SVG DXF PNG |
| First shirt, 9 in | Mirror on. Full-size iron-on design. | SVG DXF PNG |
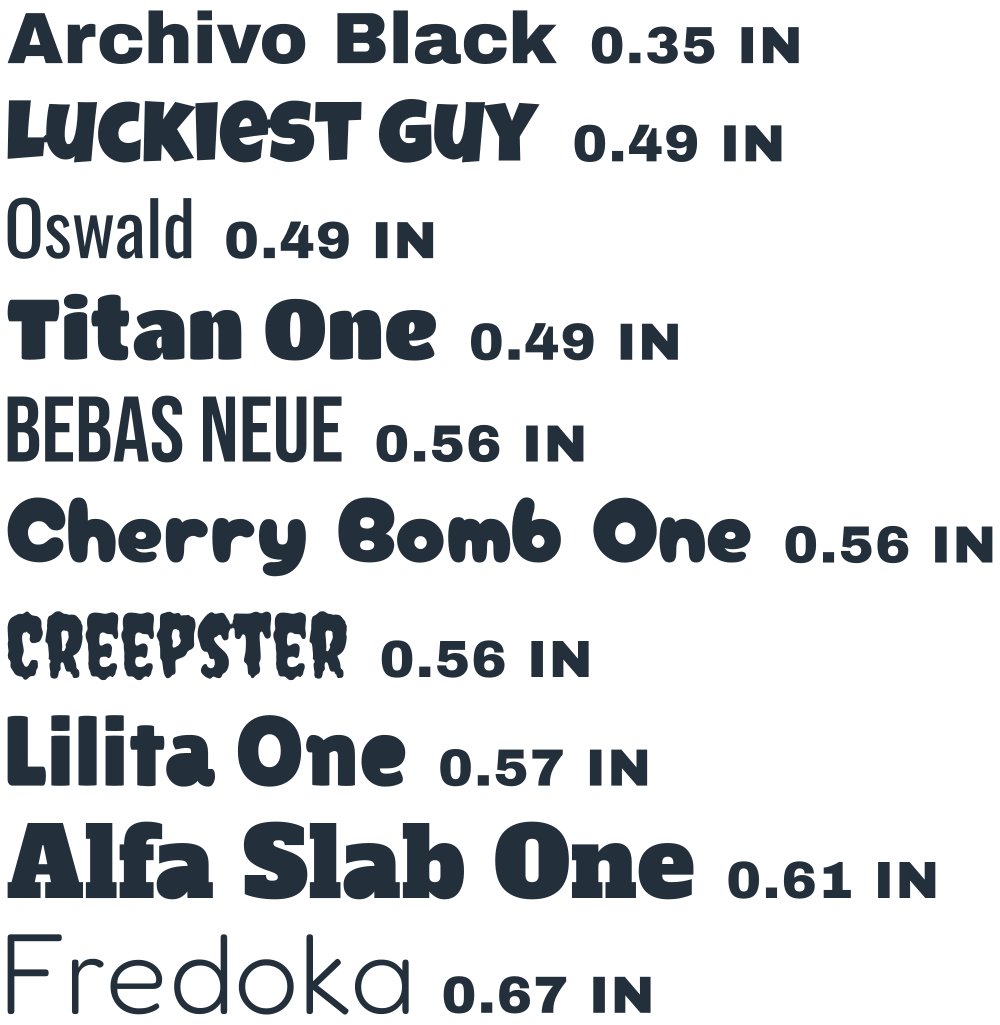
| Font test sheet | Ten bold fonts at their smallest clean vinyl size. | SVG DXF PNG |














Calibrating a new material in five minutes
- Cut the 1 in test star on a scrap with the setting you plan to use.
- Weed it. Clean edges and an unmarked liner mean the setting is right.
- A corner still attached: choose More pressure and cut again. Liner scored deeply or cut through: choose Less.
- Write the material, brand and setting that worked in your station log.
- Cut the weeding practice sheet to see how small a detail that material holds.
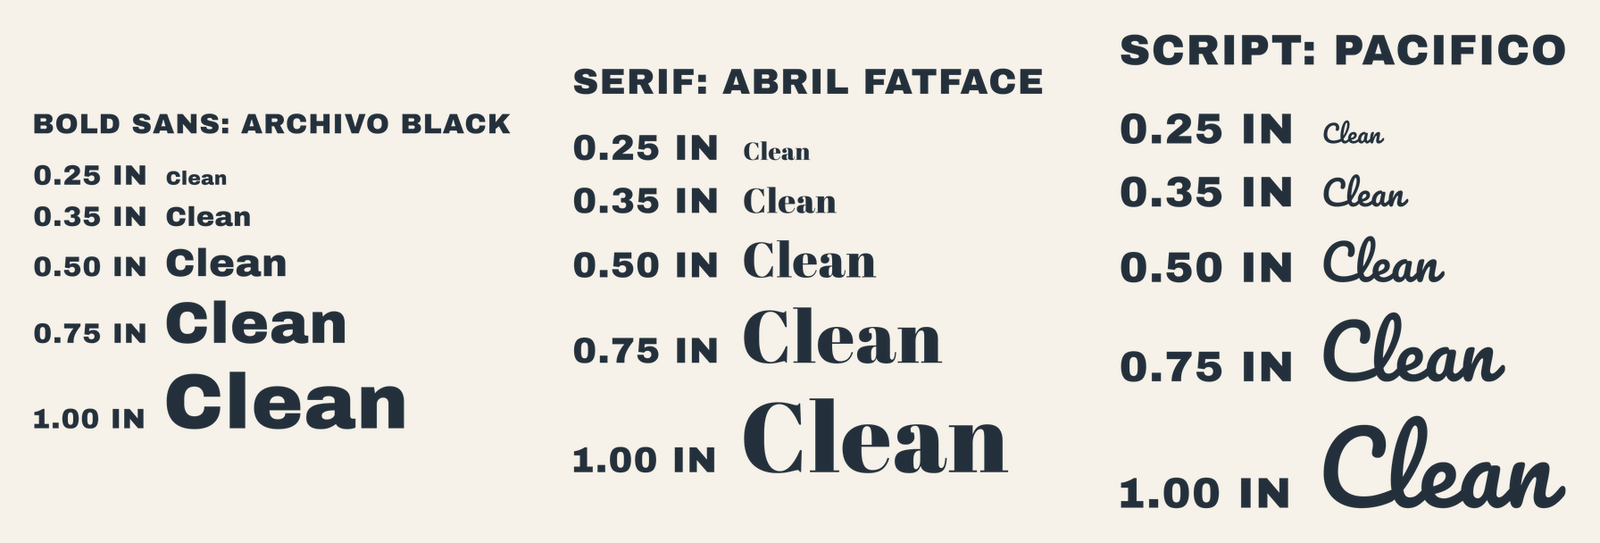
For lettering, our size ladder is a teaching file that deliberately includes text below the cutting limit, so you can see where small letters fail on your material:
| File | Size | Material | Layers | Check |
|---|---|---|---|---|
| Size ladder — Archivo Black | 9 × 6 in | Vinyl | 1 layer | Test file, not checked |
| Size ladder — Abril Fatface | 7 × 6 in | Vinyl | 1 layer | Test file, not checked |
| Size ladder — Pacifico | 5.62 × 5.88 in | Vinyl | 1 layer | Test file, not checked |
Troubleshooting
Most problems trace back to four things: the material setting, the blade, the mat, or Mirror. Work down the list in order. Fixes follow Cricut’s own troubleshooting steps where Cricut has published them (cutting pressure issues, machine troubleshooting).
Swipe the table sideways to see every column →
| Problem | Usual cause | What to do |
|---|---|---|
| Doesn’t cut all the way through | Wrong material setting, debris on the blade, worn blade. | Check the setting matches the material. Clean the blade tip. Choose More in the pressure menu. Still short? Raise the custom pressure 2-4 points at a time. Then try a new blade. src |
| Tears or drags paper | Wrong setting, a design too small or detailed, Fast Mode, debris. | Turn Fast Mode off. Try a simpler or larger shape. Clean the blade. Choose Less pressure. src |
| Cuts through the vinyl backing | Too much pressure, or a cardstock setting chosen for vinyl. | Pick the vinyl setting by name, then Less pressure. Cut the 1 in test star. src |
| Shirt words read backward | Mirror was off. | On the Make screen turn Mirror on for every iron-on mat. Design Space usually turns it on when you pick an iron-on setting; check anyway. src |
| Iron-on cut through the clear liner | Placed shiny side up. | Shiny liner side down on the mat. src |
| Material slides or bubbles on the mat | Mat has lost its grip, or the material wasn’t pressed down. | Smooth with a scraper or brayer. Clean or replace the mat; mats are consumables. Felt wears grip out faster. src |
| Pieces end up in a different place on the mat | Design Space packs shapes together to save material. | Select the pieces and Attach them before Make. src |
| A score or pen line got cut | Its Operation was still Cut, or it wasn’t attached to its shape. | Set the Operation to Score or Draw, then Attach it to the cut shape. src |
| Cardstock curls when it comes off | Peeling the card off the mat. | Flip the mat over and peel the mat away from the card. src |
| Tiny letters tear while weeding | Text too small or thin for that material. | Make it bigger, or pick a bolder font. Cut our size ladder to find your vinyl’s limit. |
| Smart Material loaded crooked | Not against the left guide. | Unload and reload it square. Trim the end straight across. src |
| Iron-on peels after washing | Time, heat or pressure off; washed too soon. | Use the Heat Guide settings for that exact material and blank. Wait 24 hours, wash inside out. src |
| Ghosting or blotches on Infusible Ink | Stray ink pieces or reused butcher paper. | Pick stray bits off with tweezers, not fingers. Use fresh butcher paper every press. src |
| “Unsupported operating system” or won’t install | Old Windows or macOS, a Chromebook, or Windows S Mode. | Check Cricut’s current system requirements. Chromebooks and Linux are not supported. src |
Running the station
Mats
Mats are consumables. Every mat loses its stickiness with use, and felt and other fuzzy materials wear it out faster. Pick scraps off after each cut and put the clear cover sheet back on. Keep one mat per grip color in rotation and label them. When material slides even after smoothing, replace the mat (Cricut).
Blades
Blades and cutting tools are sharp, and Cricut marks them adult use only. Have staff change them. When cuts start dragging or leaving tabs, clean the tip first, then replace the blade. The Knife Blade and Rotary Blade fit Maker machines only; the deep-point blade needs its own black housing (Cricut).
Supplies to keep stocked
- Permanent and removable vinyl, Everyday Iron-On in black and white
- Transfer tape (standard grip; strong grip only for textured vinyl, per Cricut)
- 65 lb and 80 lb cardstock
- Spare Light, Standard and Strong Grip mats
- Weeding hooks, scrapers, tweezers, scissors, a small trimmer
- A spare Fine-Point blade or cutting tool
- Butcher paper and heat-resistant tape if you press Infusible Ink
Patron orientation
Print the station card and tape it next to the machine with the settings chart. It covers the cut order, clean-up, safety and the three most common fixes.
Cutting machine station card
Every cut, in this order
- Size the design on the Canvas. Check the width and height boxes.
- Click Make. Iron-on or Infusible Ink? Turn Mirror on for that mat.
- Pick the material by name (Browse All Materials). Explore Air 2: dial to Custom first.
- Material on the mat: vinyl and iron-on liner side down. Smooth it flat. Line it up with the top-left corner of the grid.
- Load the mat, check the blade Design Space asks for, press Go.
- Don’t touch the mat or the rollers while it cuts.
- Unload. Peel the mat away from paper and cardstock, not the other way around.
Before you leave
- Pick scraps off the mat and put its clear cover back on.
- Blade back in the machine, cap on any spare blade.
- Write down anything that went wrong in the log.
Safety
- Blades are sharp. Cricut labels blades and tools adult use only: staff change them.
- Heat presses get hot enough to burn. Use the mat or stand and switch it off after.
- Cricut machines are not food safe.
If it goes wrong
- Didn’t cut through: pick More pressure, clean the blade tip, cut a test shape.
- Cut through the backing: pick Less pressure, check the material setting.
- Words backward on a shirt: Mirror was off.
Material log: what worked
| Date | Material and brand | Machine | Setting that worked | Initials |
|---|---|---|---|---|
Independent guide, not affiliated with Cricut. Cricut and Design Space are trademarks of Cricut, Inc.
Program ideas
Projects that work well in a one- or two-hour session, with the material each one needs:
Cricut help links that moved
Cricut reorganizes its help center often, and many makerspace and library guides still point at pages that are gone. Every “old link” below returned a 404 or no longer resolves when we checked on October 1, 2026. If your guide uses one, here’s the current Cricut page that covers the same thing.
Swipe the table sideways to see every column →
| Old link (now dead) | What it was | Current page |
|---|---|---|
help.cricut.com/help/cricut-explore-materials-settings | Explore materials and settings list | Which materials can I cut with my Cricut smart cutting machine? (all machines) |
help.cricut.com/help/system-requirements-design-space | Design Space system requirements | System Requirements – Design Space |
…/articles/360009448534 (Canvas Overview) | Tour of the Design Space Canvas | Canvas screen – Design Space Guide |
…/articles/360009386614 (Layers Panel) | Layers panel tools | Canvas screen guide, "Layers Panel" section |
…/articles/360009508433 (Selecting Linetype) | Cut, Draw and Score settings | Design Space: Selecting Operation |
…/articles/360024038193 (Infusible Ink images and fonts) | Choosing designs for Infusible Ink | How to use Infusible Ink |
…/articles/360009432654 and 360009558333 (Premium Vinyl) | Vinyl cutting and application | Cricut Vinyl |
…/articles/360009552833 (Glitter Iron-On) | Glitter iron-on instructions | Cricut Specialty Iron-On |
ds4.cricut.com | Old Design Space web address | design.cricut.com |
cricut.com/en/shop-cricut-access/… | Cricut Access subscription page | cricut.com/en-us/join-cricut-access |
shop.cricut.com/en_us/… (mats, XL Scraper, tool sets) | Store product pages | cricut.com/en-us/tools-accessories |
Use and cite this guide
You’re welcome to link to this page, print the chart and station card for your space, and share the PDFs with patrons and staff. No ads, no sign-up, nothing to buy. The cut files are free for classrooms, libraries and personal projects under our license; please link people to this page rather than reposting the files.
APA: Clean Cut SVG. (2026, October 1). The Cricut makerspace guide. https://cleancutsvg.com/cricut-makerspace-guide/
MLA: “The Cricut Makerspace Guide.” Clean Cut SVG, 1 Oct. 2026, cleancutsvg.com/cricut-makerspace-guide/.
Found an error or a setting that changed? Email hello@cleancutsvg.com. We re-check this page against Cricut’s help center every quarter. This is an independent guide. It is not made, sponsored or reviewed by Cricut, Inc. Cricut, Design Space, Explore, Maker, Joy, EasyPress and Infusible Ink are trademarks of Cricut, Inc.
Sources
All Cricut help center pages, checked October 1, 2026: materials list, mats, blades and tools, choosing material settings, cut pressure, Smart Materials, system requirements, Canvas guide, Operation, Combine, Slice and Weld, Attach, Mirror, Everyday Iron-On, Specialty Iron-On, Infusible Ink, Infusible Ink FAQ, cardstock, glitter cardstock, vinyl, transfer tape, Knife Blade, chipboard, basswood, leather, craft foam, window cling, sticker paper, kraft board, poster board, vellum, stencil, FabricGrip mat, cutting pressure issues, machine troubleshooting, Maker 5 tools, Heat Guide.