To make a shirt with a Cricut, you cut iron-on vinyl (HTV) with the design mirrored and the shiny liner facing down, weed away everything that isn’t the design, then press it onto the shirt with the time, temperature and peel method from the vinyl maker’s guide. Four steps. Most first-shirt problems come from skipping one detail in one of them, so this guide goes slowly through each.
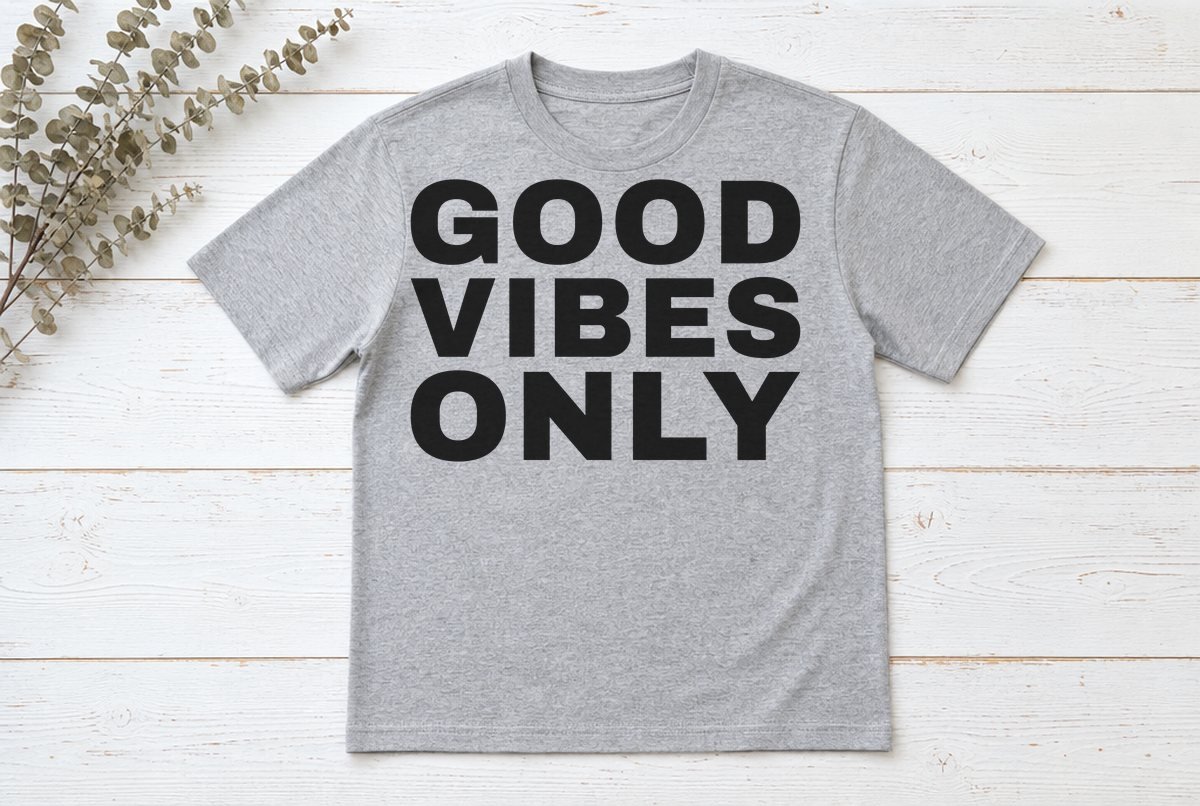
You’ll practice with a plain, bold design: GOOD VIBES ONLY, three stacked words at 9.1 x 6.62 in, which is a standard front-of-shirt size for adult tees. It’s one color and has no script or thin lines, so the weeding is forgiving.

| File | Size | Material | Layers | Check |
|---|---|---|---|---|
| Good Vibes Only — first shirt | 9.12 × 6.62 in | HTV (iron-on) | 1 layer | ✓ Cut-checked |
Why this file makes an easy first shirt
Each word is stretched to the same width and stacked, the block-letter layout you’ve seen on a thousand shirts. The font is a heavy sans serif, and the whole design is welded into one layer, so the blade follows each letter’s edge once and you cut a single color.
What you will weed: the background, plus the counters (the holes) in the three O’s, the D and the B. They’re big, so they lift out with a hook in one go. Our checker tested the file at its 9.1 in size against our iron-on limits: no stroke thinner than 0.04 in and no loose piece small enough to lose on the mat. Iron-on gets a wider limit than adhesive vinyl because it’s thicker and stretchier to weed.
What you need
- Iron-on vinyl (HTV) in one color, a piece at least 10 x 7.5 in
- A plain T-shirt; cotton and cotton blends are the easiest start
- StandardGrip cutting mat
- Weeding hook
- Heat press, Cricut EasyPress or a household iron
- A firm, flat pressing surface (a pressing mat or folded towel on a table)
- Ruler or tape measure
- Lint roller (optional but useful)
Step by step
- Wash the shirt first. Cricut’s iron-on instructions say to pre-wash fabric without fabric softener. Washing pre-shrinks the shirt and removes finishes that can stop the vinyl from sticking.
- Upload and check the size. Unzip the download and upload good-vibes-only-shirt.svg to a Canvas (step-by-step in our upload guide). The size boxes should read about 9.1 in wide and 6.62 in tall. Keep the lock closed if you resize.
- Select Make and turn Mirror on. Iron-on is cut from the back, through the vinyl but not the clear carrier sheet, so the design has to be backwards on the mat to read correctly on the shirt. On the Prepare screen, toggle Mirror on for the mat. Design Space also turns Mirror on automatically when you pick an iron-on material setting and shows a message saying so. Look at the mat preview: the words should read backwards.
- Put the vinyl shiny side down. Lay the iron-on on a StandardGrip mat with the shiny liner against the mat and the dull, colored side facing up. Smooth it flat with your hand or a scraper, especially at the corners.
- Pick the material and cut. Choose the setting that matches your iron-on (use Browse All Materials on desktop or All Materials in the app to find it; on an Explore Air 2, turn the dial to Custom first). Load the mat when prompted and press Go. Cricut recommends a small test cut on any new material; our test cut file and troubleshooting guide helps if it doesn’t cut cleanly.
- Weed. Unload, peel the vinyl off the mat, and pull away the background from one corner. The letters stay stuck to the shiny liner. Then pick out the counters inside the O’s, the D and the B with your hook. More tips in how to weed vinyl.
- Find the center. Lay the shirt flat, fold it in half lengthwise and press a quick crease down the middle. Fold the weeded design in half the same way (liner and all) to find its center. Line the two creases up, with the design a hand’s width or so below the collar.
- Press. Look up your vinyl and shirt fabric in the Cricut Heat Guide, or the instructions that came with non-Cricut vinyl, and use exactly the temperature, time and pressure it gives. Pre-heat the shirt as the guide says, place the design liner side up, and press.
- Peel the liner. Some iron-on peels hot, some warm, some only once it’s cool. The Heat Guide tells you which. Peel slowly at a low angle. If a letter lifts with the liner, lay the liner back down and press again for a few seconds before trying again.
Iron-on settings vary by brand, by vinyl type and by fabric, and a wrong guess shows up as peeling after the first wash. Don’t borrow numbers from a video or a different product. Use the maker’s guide for the exact vinyl you bought.
Pressing with a household iron
An iron works for a first shirt; it just takes more care. Turn off the steam. Press on a hard table with a pressing mat or folded towel under the shirt: Cricut’s instructions specifically say to avoid flimsy ironing boards, which flex and soak up the pressure you need. Press straight down rather than gliding the iron around, and cover the whole design.
Cricut’s instructions for its own iron-on products include iron directions, and many other brands print theirs on the package. Follow those for time and temperature.
Sizing the design for different shirts
We built and checked this file at 9.1 in wide. Making it bigger is always safe. Making it smaller wasn’t part of our check, so if you shrink it, keep an eye on the gaps between letters as they get narrower.
| Item | Suggested width | Notes |
|---|---|---|
| Adult S to M tee | 9.1 in (as supplied) | Upload and cut as is |
| Adult L to XL tee | 9.1 to about 10.5 in | Measure the flat chest and leave a margin each side |
| Adult 2XL and up | About 10.5 to 11.5 in | Make sure your vinyl piece is big enough |
| Crewneck sweatshirt | 9.1 to about 11 in | Look up your sweatshirt’s fabric in the Heat Guide |
| Tote bag | 9.1 in, or larger on a big bag | Look up canvas in the Heat Guide |
A quick way to size by eye: print the PNG from the download at your chosen width, cut it out, and hold it against the shirt.
The first-shirt mistakes
Forgetting to mirror
The words come out backwards on the shirt. Since Design Space turns on Mirror automatically for iron-on settings, this mostly happens when someone picks a non-iron-on setting or switches Mirror off. Glance at the mat preview before you press Go.
Vinyl shiny side up
The blade cuts the clear liner instead of the vinyl, and nothing weeds. Shiny side down, always.
Weeding the wrong parts
With a single-color design, you keep the letters and remove everything else, including the holes inside letters. If you’re unsure, look at the PNG in the download: anything dark stays.
Pressing too softly
Letters that lift at the edges after peeling usually needed more pressure, more heat time, or a firmer surface underneath. Re-press with the liner back on before you give up on the shirt.
Pressing over a seam or collar
A seam under the design keeps the press from touching the vinyl evenly. Place the design where the fabric is flat, or put a folded towel inside the shirt to even out the surface.
Washing too soon
Cricut’s care instructions for Everyday Iron-On say to wait 24 hours before washing, then wash and tumble dry inside out, with no bleach. Other vinyls have their own rules, so check the package.
Where to go from here
Once one color feels easy, try a design with script, like our Mama SVG, or a Halloween shirt such as Hey Boo. Two colors on one shirt is the next step up, and it has its own tricks for avoiding scorching; see how to layer HTV.
Questions
Do you have to mirror iron-on vinyl on a Cricut?
Yes. Iron-on is cut from the back with the shiny liner down, so the design has to be mirrored to read the right way on the shirt. Design Space turns Mirror on automatically when you choose an iron-on material setting.
Which side of HTV goes down on the Cricut mat?
The shiny side, which is the clear heat-resistant liner, goes down on the mat. The dull, colored side faces up toward the blade.
What size should a shirt design be?
For an adult tee, a design around 9 to 11 in wide is a common starting point. Our practice file is 9.1 in wide; measure the shirt and leave a margin on each side.
Can I use a regular iron instead of a heat press?
Yes. Turn off the steam, press on a firm table rather than an ironing board, press straight down, and follow the time and temperature from your vinyl’s instructions.