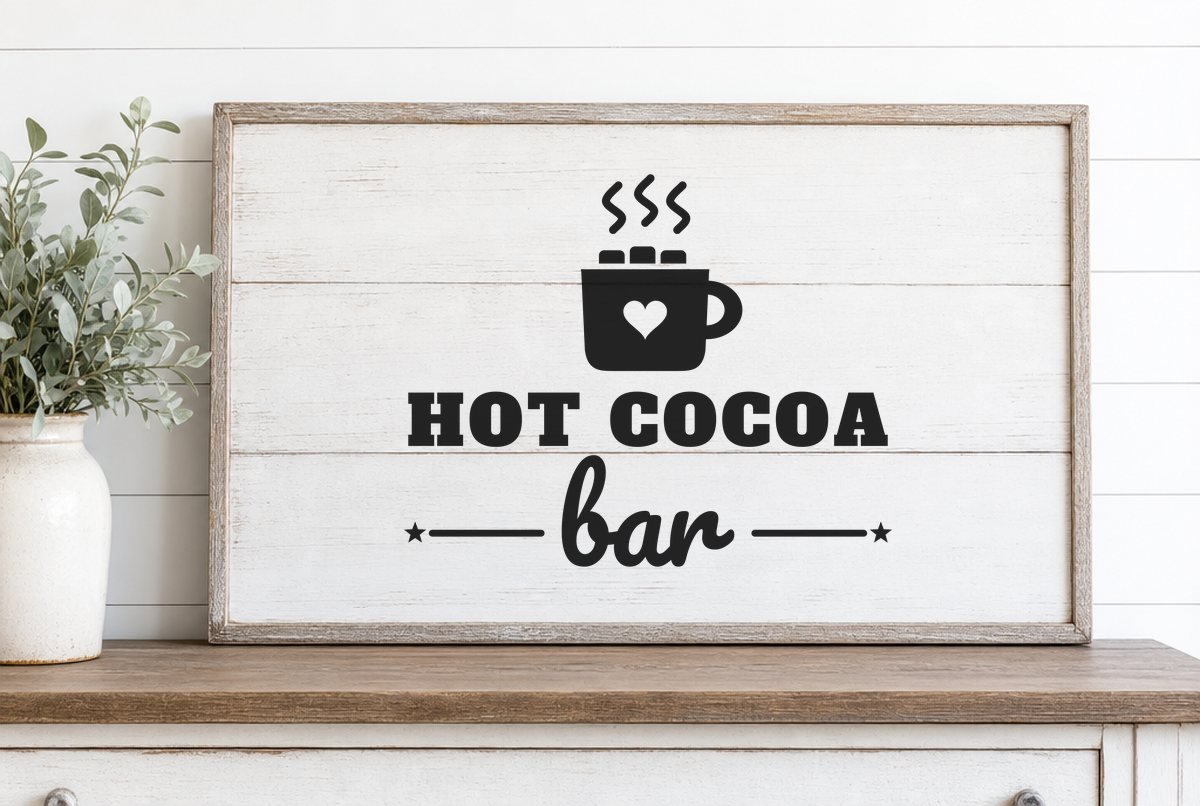
A hot cocoa bar needs one thing more than anything else: a sign that tells people where to stand with their mugs. This free Hot Cocoa Bar SVG gives you that sign plus the small pieces that make the table look finished, a standalone cocoa mug icon and four script labels for your topping jars.
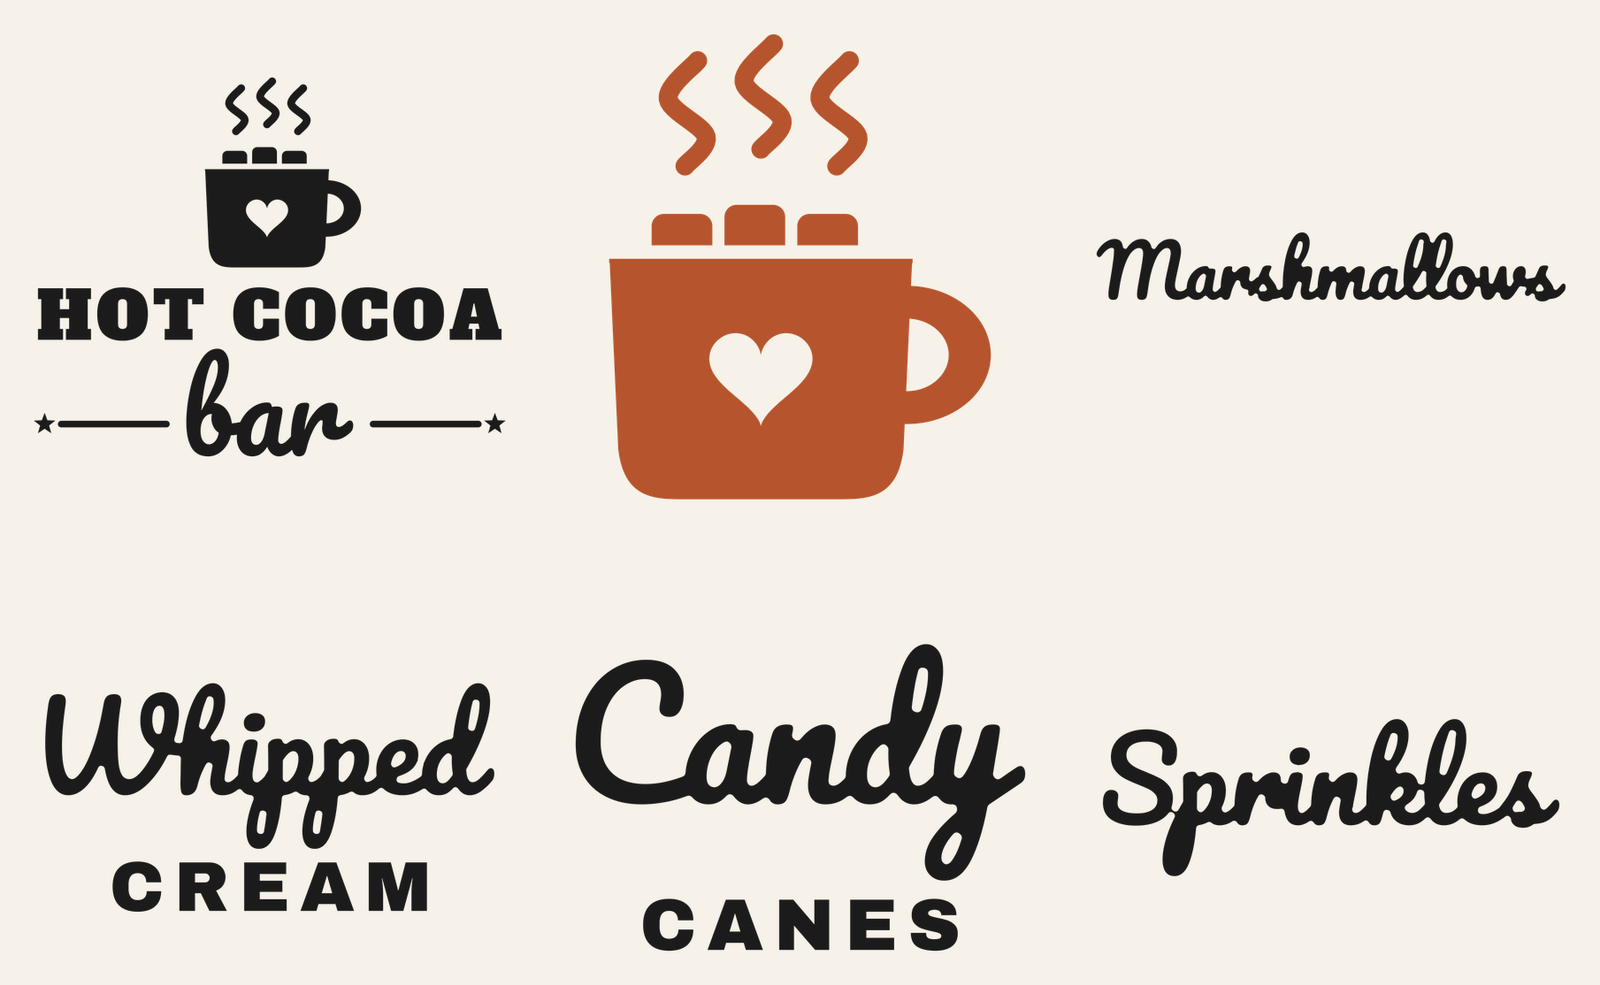
The sign lettering is 10.12 x 8.25 inches, sized for a 12×16 board with an inch or so of border. A steaming mug with marshmallows sits over “HOT COCOA” in chunky slab capitals, and “bar” in script underneath, framed by two short rules with a star on each end. Everything is built for adhesive vinyl and cuts on a standard 12×12 mat.
| File | Size | Material | Layers | Check |
|---|---|---|---|---|
| Hot Cocoa Bar sign lettering (10 in, fits a 12x16 board) | 10.12 × 8.25 in | Vinyl | 1 layer | ✓ Cut-checked |
| Cocoa mug icon (4 in) | 4.12 × 5 in | Vinyl | 1 layer | ✓ Cut-checked |
| Topping jar label: Marshmallows (5.4 in) | 5.5 × 1 in | Vinyl | 1 layer | ✓ Cut-checked |
| Topping jar label: Whipped Cream (3.5 in) | 3.75 × 2 in | Vinyl | 1 layer | ✓ Cut-checked |
| Topping jar label: Candy Canes (2.5 in) | 2.62 × 1.88 in | Vinyl | 1 layer | ✓ Cut-checked |
| Topping jar label: Sprinkles (3.3 in) | 3.5 × 1.38 in | Vinyl | 1 layer | ✓ Cut-checked |
What’s in the ZIP
Six files, each as SVG, DXF and PNG:
- Hot Cocoa Bar sign, 10.12 x 8.25 in, one color
- Cocoa mug icon, 4.12 x 5 in, the same mug drawn larger for a jar, canister or second sign
- Topping labels: Marshmallows (5.5 x 1 in), Whipped Cream (3.75 x 2 in), Candy Canes (2.62 x 1.88 in) and Sprinkles (3.5 x 1.38 in)
The mug is the part worth understanding before you weed. It isn’t one solid blob. The three marshmallows sit just above the rim as their own small rounded pieces, separated from the mug by a thin gap, and the three steam curls float above them as separate strokes. The heart in the middle of the mug is a knockout, so it shows whatever color your board is. On the sign, the small star at the end of each rule sits just clear of the line, so each side is two pieces: the rule and its star.
The labels mix two styles. Marshmallows and Sprinkles are a single script word. Whipped Cream and Candy Canes stack a script word over small, widely spaced block capitals. The script letters are welded, so each word cuts as one continuous line instead of a pile of overlapping letters.
All six files passed our automated cut check for adhesive vinyl at the sizes above: no strokes under our minimum width, no pieces too small to weed, and no slivers of background too narrow to pick out. The narrowest spots are the steam curls on the sign and the tight counters in the small capitals on the Candy Canes label.
What you need
- Adhesive vinyl: permanent for a sign that stays up year after year, removable if you want to reuse the board
- A 12×16 wood board, painted or stained (or a framed chalkboard of about that size)
- Standard grip cutting mat, 12×12
- Weeding hook
- Transfer tape and a scraper
- Jars or canisters for toppings
- Rubbing alcohol and a lint-free cloth for glass
Making the sign
- Upload the sign file. In Cricut Design Space, click Upload, then Browse, and choose hot-cocoa-bar-sign.svg. Our upload guide covers the desktop and phone apps.
- Keep it at 10.12 in wide. It fits inside the 11.5 x 11.5 inch cutting area Cricut lists for a 12×12 mat, so there’s no need to switch mats. For a bigger board you can scale it up with the lock closed.
- Cut. Click Make It and pick the setting for your vinyl. Adhesive vinyl goes on face up, so leave Mirror off.
- Weed in order. Pull the big background first. Then lift out the heart, the counters inside the O’s, A and the script “b” and “a,” and the gaps between the steam curls. Leave the marshmallows and steam on the liner; the weeding guide has tips for keeping small pieces put.
- Tape and position. Cover the whole design with transfer tape and burnish, so the marshmallows and steam travel in the right spots. Lay the sign on the board with the backing still on, center it, and run a strip of masking tape across the top as a hinge.
- Apply. Flip the design up on the hinge, peel away the backing, and lower it onto the board, smoothing from the center out. Burnish well, then peel the transfer tape back low and slow.
Let the paint or stain on the board cure fully before the vinyl goes on. Vinyl on paint that’s still soft can grip poorly now and pull paint later.
Labeling the topping jars
The labels go on the same way as the sign, only smaller. Wipe each jar with rubbing alcohol first and let it dry, because fingerprints are the usual reason jar labels lift at the edges. Put the label on the flattest part of the jar, and on a round jar, press the middle down first and work outward so the ends follow the curve without creasing.
Match the label to the jar, not the other way around:
| Label | Size | Good spot |
|---|---|---|
| Marshmallows | 5.5 x 1 in | A wide canister or a large jar with a long, fairly straight side |
| Whipped Cream | 3.75 x 2 in | A mid-size jar, or the front of a small serving bowl |
| Sprinkles | 3.5 x 1.38 in | A mid-size or small jar |
| Candy Canes | 2.62 x 1.88 in | A tall, narrow jar or a cup holding the canes upright |
| Cocoa mug icon | 4.12 x 5 in | A cocoa mix canister, a tray, or a second small sign |
Scaling any of these up is fine. Shrinking below the sizes in the table is where it goes wrong: the steam curls get too thin to cut cleanly, and the counters in the small capitals close up to slivers you can’t weed. If a label is too long for your jar, pick a different jar or put the label on a tag tied around the neck.
Keep the vinyl on the outside of the jar and away from any rim people drink or scoop from. If you plan to put the jars through a dishwasher, check the care instructions from your vinyl’s maker first; our permanent vs removable vinyl guide explains which type to pick for glass.
Colors and other ways to use it
White vinyl on a dark stained board reads well across a room. Black on a whitewashed board gives you the look in our preview. The sign file is one color by design. If you want a pop of rust like the preview’s standalone mug, put the 4 inch mug icon on the cocoa canister and keep the sign itself in a single color.
The mug icon also works alone on a plain mug or a gift-bag tag for cocoa bombs. And if you’re setting up a whole holiday table, the Cookies for Santa SVG and the Merry Christmas SVG sit well on the same table.
One snag to expect: if the steam curls tear while you weed, you’re probably pulling the background toward them. Turn the mat and peel the background away from the curls instead, so each curl is pressed down by the pull rather than lifted.
Questions
What size board do I need for the Hot Cocoa Bar sign?
The lettering is 10.12 x 8.25 inches, laid out for a 12×16 board. That leaves about an inch on each side. You can scale it up for a larger board with the proportions locked.
Is the mug part of the same piece as the lettering?
The mug body and handle are one piece, but the three marshmallows and three steam curls are separate small pieces. Transfer tape keeps them in place when you move the sign to the board.
How small can I make the topping labels?
Use the sizes in the download as your minimum: 5.5, 3.75, 3.5 and 2.62 inches wide. Those are the sizes that passed our cut check for adhesive vinyl. Smaller than that, the small capitals and script joins get too fine to weed.
Can I put vinyl labels on jars that hold food?
Yes, as long as the vinyl stays on the outside of the jar and away from rims. Follow your vinyl maker’s care instructions for washing.