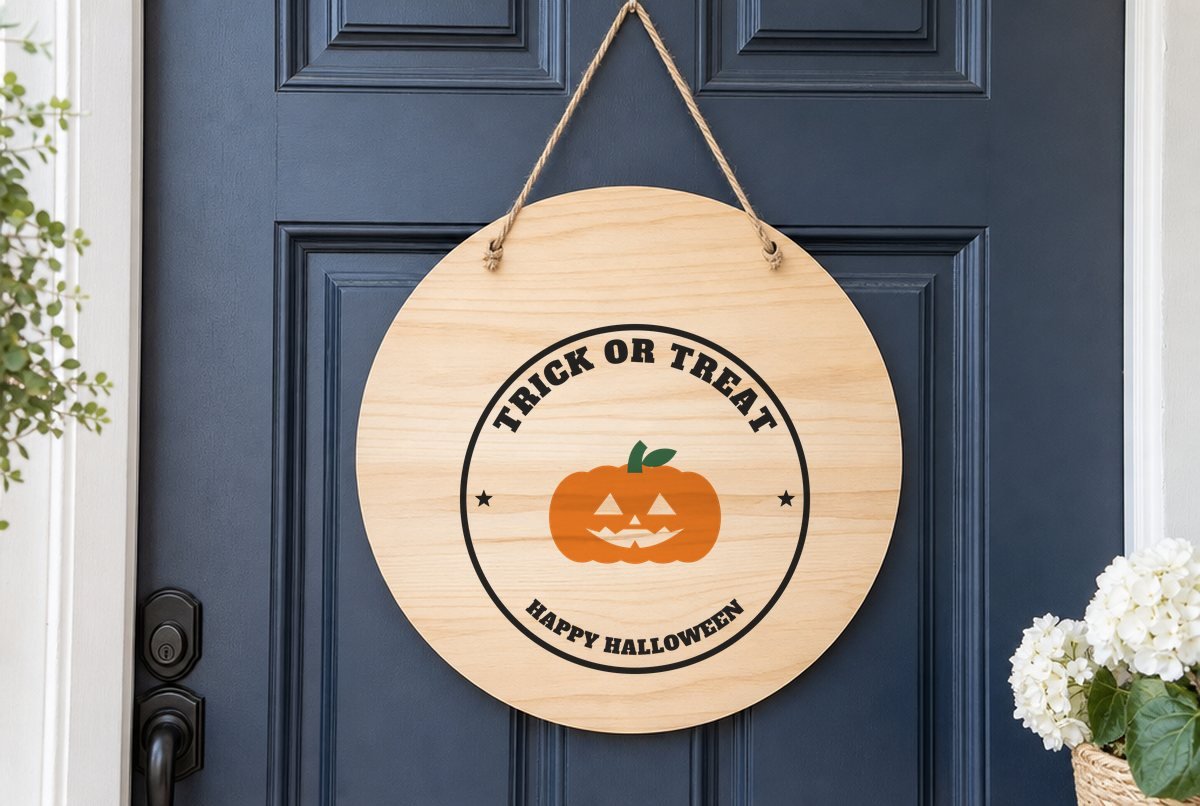
Round wood signs are the hardest layout to get right on your own, because the lettering has to follow the curve without the letters crowding at the top or splaying apart at the bottom. This file does that part for you. “TRICK OR TREAT” arcs across the top, “HAPPY HALLOWEEN” curves along the bottom, a jack-o’-lantern sits in the middle, and a thin border ring with two small stars frames the whole thing.
It comes two ways, both 11.1 inches across and built for adhesive vinyl: a single-color version where everything cuts from one sheet, and a three-color version split into lettering, pumpkin and stem layers. At 11.1 inches it fits a 12 inch wood round with a little breathing room, and it cuts on a standard 12×12 mat.

| File | Size | Material | Layers | Check |
|---|---|---|---|---|
| Trick or Treat round sign, single color | 11.12 × 11.12 in | Vinyl | 1 layer | ✓ Cut-checked |
| Trick or Treat round sign, 3 color | 11.12 × 11.12 in | Vinyl | 3 layers | ✓ Cut-checked |
What you get and how it’s put together
The single-color sign is one layer. The border ring, both lines of text, the stars and the pumpkin with its carved face all cut together, so you weed once and transfer once. The pumpkin’s eyes, nose and jagged grin are knockouts, which means the wood shows through as the face.
The three-color sign splits into:
- Lettering (black): the ring, both text arcs and the stars
- Pumpkin (orange): the body, with the face knocked out
- Stem (green): the stem and leaf as one piece
Every layer is welded into closed paths and passed our cut check at 11.1 inches for adhesive vinyl. The spots that need attention are the gaps between letters in the arcs. On a curve, letters at the inside edge sit closer together than at the outside, and our check looks specifically for slivers too narrow to weed. These passed at full size. If you shrink the sign much, those gaps close up first.
If you want to learn the rules behind laying out text like this, we cover them in how to curve text for round signs, using this same design as the example.
What you need
- Wood round, about 12 in (painted or stained and fully dry)
- Permanent adhesive vinyl: black, or black plus orange and green for the three-color version
- Standard grip cutting mat, 12×12
- Transfer tape (standard grip)
- Weeding hook and scraper
- Ruler or a pencil mark for centering
- Clear sealer if the sign will hang outdoors (optional)
Making the door sign
- Prep the round. Paint or stain it and let it dry completely. Vinyl on tacky paint can lift or pull the paint when you remove the transfer tape.
- Upload and check the size. In Cricut Design Space, click Upload, then Browse, and choose the SVG (see our upload guide if you’re new to it). Confirm it reads 11.1 inches wide. Keep it at that size; the sizing section below explains why.
- Cut. Click Make It. The three-color file lands on three mats, one per color. Pick the setting that matches your vinyl.
- Weed. Start with the text arcs. Pull the background away from the ring outward, and use the hook on the centers of letters like R, O and A. The face on the pumpkin comes out as small triangles and a zigzag; pick those last.
- Center and apply the lettering. Mark the center of the round lightly in pencil. Cover the lettering layer with transfer tape, burnish, peel the backing, and lay it down starting from the middle. Burnish again and peel the tape back slowly at a low angle.
- Add the pumpkin, then the stem (three-color only). Put the orange pumpkin in the open space in the middle, then place the green stem so it tucks in at the top of the pumpkin. Line each one up by eye against the stars, which sit on the pumpkin’s center line.
For the three-color version, weed and transfer the black layer first. The ring and text give you a fixed frame, and it’s much easier to drop a single pumpkin into a frame than to build lettering around a pumpkin.
Sizing for different rounds
| Surface | Design size | Notes |
|---|---|---|
| 12 in wood round | 11.1 in (as downloaded) | Leaves a small margin at the edge |
| 14 in round | 11.1 in (as downloaded) | Wider bare border; paint a contrasting ring around the edge to fill it |
| Door wreath center or rectangular sign | 11.1 in | The ring gives it its own round frame on any background |
Why not scale up for a 14 or 18 inch round? A circle has to fit the width of the mat, and a 12 inch wide mat can’t take a round design much past 11.5 inches. A 12×24 mat is longer, not wider, so it doesn’t help here. For big rounds, you’d need a machine that handles wider material, or you can split the sign into pieces and piece it together on the wood as a stencil.
We don’t recommend shrinking this one below 11.1 inches. The letter gaps along the arcs are the first thing to fail, and on a round sign a few weeded-out slivers in the middle of “TREAT” are hard to hide.
Variations
The single-color file works in white vinyl on a black-painted round, which reads well from the sidewalk at night under a porch light. The three-color file on natural stained wood gives you the classic orange-and-black look without painting at all. Both files also make good stencils: cut them from stencil vinyl, stick them down, paint through, and peel. If you go that route, the Happy Fall Y’all porch sign article walks through painting with a stencil on wood.
Want a matching pumpkin somewhere else, like a treat bucket? The free pumpkin SVG set has three pumpkin styles on their own.
A door sign lives outside, and outdoor sun and rain are hard on vinyl. Use a vinyl rated for outdoor use and follow its maker’s guidance on sealing. If you’re not sure your sealer plays well with vinyl, test it on a scrap first.
Questions
What size wood round do I need for this trick or treat sign?
A 12 inch round fits the file as downloaded, since the design is 11.1 inches across. On a bigger round, keep the design at 11.1 inches and paint a contrasting border around it, since a round design much past 11.5 inches won’t fit the width of a 12 inch mat.
How do I line up the three colors?
Apply the black lettering layer first, then place the orange pumpkin in the open center and tuck the green stem on top. The two stars sit level with the pumpkin, so they work as guides.
Can I make the sign smaller?
We don’t recommend it. The file passed our cut check at 11.1 inches, and the gaps between the curved letters are the first thing to get too narrow to weed when you shrink it.