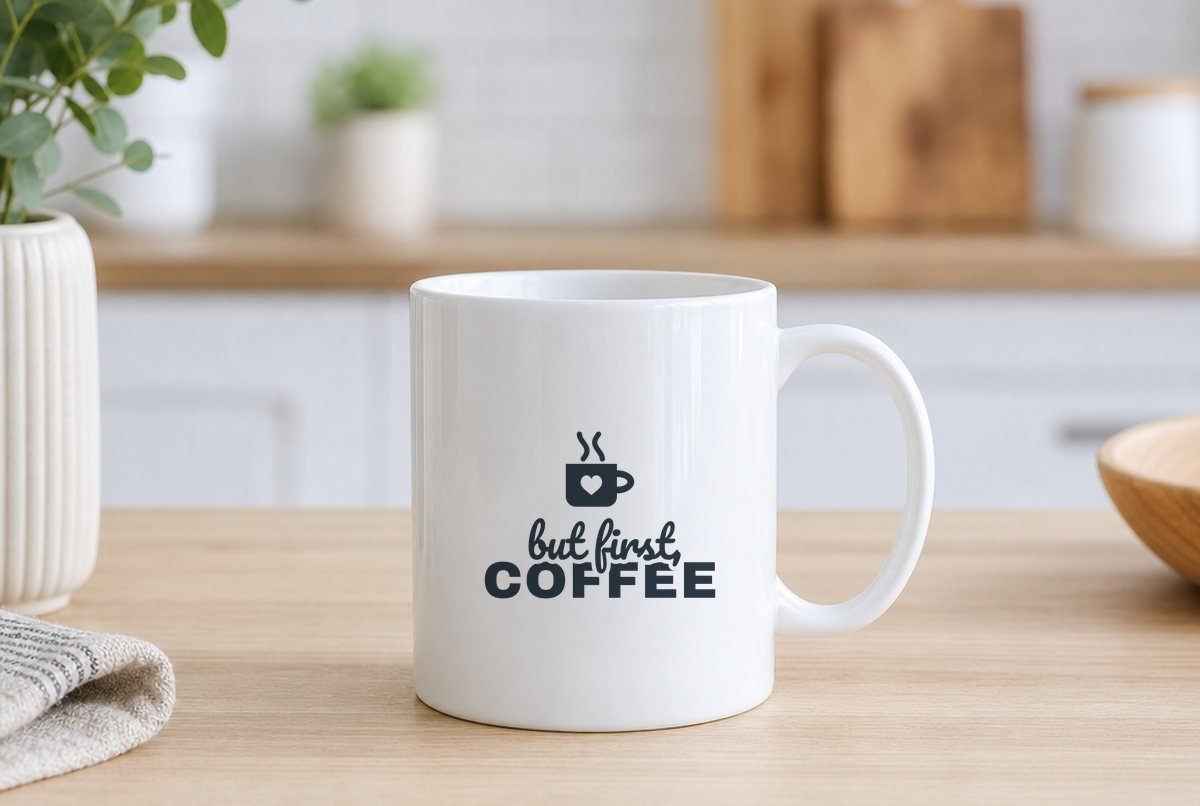
An 11 oz mug and a 15 oz mug need different sizes, and a design that looks right on one looks cramped or lost on the other. So this file comes in both. It’s a steaming mug icon with a heart cut out of its side, but first, in a casual script, and COFFEE in chunky block letters underneath.
The 11 oz file is 3.1 x 2.28 in and the 15 oz file is 3.5 x 2.57 in. There’s also a text-only version at 3.35 x 1.23 in for a tumbler, canister or anywhere a shorter design fits better. All three are built for permanent adhesive vinyl.

| File | Size | Material | Layers | Check |
|---|---|---|---|---|
| But First, Coffee (11 oz mug) | 3.12 × 2.38 in | Vinyl | 1 layer | ✓ Cut-checked |
| But First, Coffee (15 oz mug) | 3.5 × 2.62 in | Vinyl | 1 layer | ✓ Cut-checked |
| But First, Coffee (text only) | 3.38 × 1.25 in | Vinyl | 1 layer | ✓ Cut-checked |
Where the script meets the block letters
The interesting part of this design is the overlap. The script sits low enough that the tail of the “f” and the comma dip down into the top of COFFEE. Instead of stacking two separate shapes (which would leave a messy double cut), we cut a thin outline gap around the script where it crosses the block letters. On the finished mug you see a narrow channel of mug color separating the two, like the script is sitting in front.
That gap is the thing to watch when you weed, and it’s why these files are built at their final sizes instead of one file you scale down. We measured it at each size: every gap and stroke passed our adhesive-vinyl minimums at 3.1, 3.5 and 3.35 in wide. Shrink one below its listed size and those channels get narrower than a hook can reliably clear.
Each file is one color, welded, with no hairlines. The mug icon’s two steam wisps and the heart window are separate pieces you’ll see on the mat. Here’s how our cut check works.
What you need
- Permanent adhesive vinyl
- Standard grip mat (or a matless Smart Vinyl setup if your machine supports it)
- Weeding hook
- Clear transfer tape, standard grip
- Scraper or old gift card
- A clean ceramic mug and rubbing alcohol for wiping it down
Steps
- Upload the right size. In Design Space, click Upload, then Upload Image, then Browse, and pick but-first-coffee-11oz.svg or the 15 oz file. Silhouette Basic Edition users: open the matching DXF. Stuck? See how to upload an SVG to Design Space.
- Leave mirror off. Adhesive vinyl is cut face up, so the design stays as-is.
- Cut. In the Make screen, pick the setting for your vinyl. If it isn’t listed under popular materials, use Browse All Materials and search for the brand.
- Weed (details below).
- Tape and transfer. Lay transfer tape over the design, burnish well, then peel the backing away at a sharp angle.
- Apply. Wipe the mug with rubbing alcohol and let it dry. Decide where it goes: centered opposite the handle, or on one side so it faces the drinker (hold the mug in your drinking hand to see which side that is). Mark the center lightly with a dry-erase marker. Press the center of the design down first, then work outward, lifting and smoothing the edges as the vinyl wraps the curve.
Curved surfaces are where bubbles and wrinkles show up. Our full vinyl-on-a-mug guide uses this same file and walks through relief cuts in the transfer tape.
Weeding this design
Start with the easy pieces: the background around the cup, then the heart window in the cup body. The heart window is a clean shape and lifts out whole.
The steam wisps are two free-floating squiggles. Once the background is gone, check they’re still stuck to the backing before you move on.
Then the script-meets-COFFEE channels. Work these slowly with the point of your hook, starting from where each channel opens onto the wider background. The comma and the descender of the “f” each sit inside a narrow halo. Pulling from the wide end lets the thin strip come away in one piece rather than snapping.
Don’t use a strong-grip transfer tape on regular adhesive vinyl. It can hold the vinyl so tightly that the letters won’t let go of the tape when you apply them to the mug. Save strong grip for glitter vinyl.
Sizes at a glance
| Surface | File | Width |
|---|---|---|
| Standard 11 oz mug | 11 oz | 3.1 in |
| Large 15 oz mug | 15 oz | 3.5 in |
| Travel tumbler or glass can | Text only | 3.35 in and up |
| Coffee canister or jar | Text only or 15 oz | 3.35 to 5 in |
| Coffee bar sign | 15 oz, scaled up | 8 to 11 in |
Anything bigger than the listed width is safe; anything smaller isn’t checked. A standard mug fits a design roughly 3 to 3.5 in tall, and these files come in under that, so there’s room for a little breathing space at the rim.
Make it your own
Black or charcoal on a white mug is the obvious pick. A few others worth trying: copper or rose gold permanent vinyl on a matte black mug, or white on a speckled stoneware mug.
For a coffee station, pair the text-only file on a canister with our pantry labels on the sugar and tea jars.
One caution: permanent vinyl on a mug isn’t the same as a dishwasher-proof finish. Check your vinyl maker’s care instructions for how to wash it.
Questions
What size SVG for an 11 oz mug?
Our 11 oz file is 3.1 in wide by 2.28 in tall. That leaves space between the design and the rim and base on a standard mug.
What size for a 15 oz mug?
Use the 15 oz file at 3.5 x 2.57 in. The larger mug has more flat area, so the design can go up a bit.
Can I use iron-on vinyl on a mug?
No. Iron-on is made for fabric and needs heat to bond. On ceramic, use permanent adhesive vinyl.
Can I sell mugs made with this file?
Yes, up to 500 handmade items per design under our license. Sharing or reselling the SVG itself isn’t allowed.