A reverse tuck box is the classic small gift box: four walls, a lid that tucks in at the top and a second lid that tucks in at the bottom from the opposite side. It needs just one glue seam. It’s the right size for a small candle, an ornament, a few truffles or a gift card with a treat.
This template comes in two sizes. The 2.7 in cube cuts in one piece from a 12 x 12 sheet of cardstock. The 3 in cube is split into two halves that each fit on letter-size cardstock and glue together into one box. Every fold is a score line in the file, so the box folds square without measuring.

| File | Size | Material | Layers | Check |
|---|---|---|---|---|
| Reverse tuck-end box 2.7 x 2.7 x 2.7 in (one piece) | 11.38 × 9.75 in | Cardstock | 1 layer + score lines | ✓ Cut-checked |
| Reverse tuck-end box 3 x 3 x 3 in, part A (glue | 1 | 2) | 6.62 × 8.12 in | Cardstock | 1 layer + score lines | ✓ Cut-checked |
| Reverse tuck-end box 3 x 3 x 3 in, part B (glue | 3 | 4) | 6.62 × 8.12 in | Cardstock | 1 layer + score lines | ✓ Cut-checked |
What’s in the download
| File | Finished box | Flat size | Score lines |
|---|---|---|---|
| tuck-box-2-7in-one-piece | 2.7 x 2.7 x 2.7 in | 11.35 x 9.66 in | 12 |
| tuck-box-3in-part-a | 3 x 3 x 3 in (with part B) | 6.6 x 8.11 in | 6 |
| tuck-box-3in-part-b | 3 x 3 x 3 in (with part A) | 6.6 x 8.11 in | 6 |
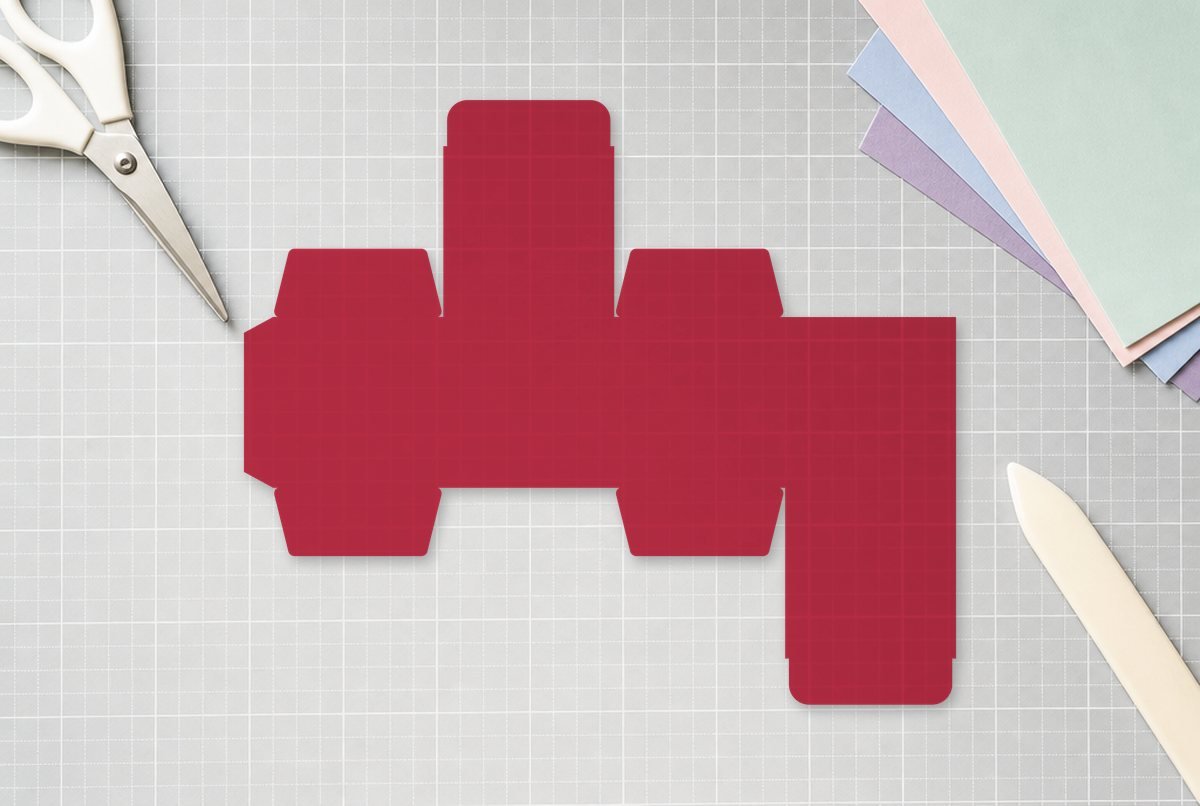
The one-piece box is laid out as a strip: a glue flap, then panels 1, 2, 3 and 4. Panel 2 carries the top lid and its tuck flap. Panel 4 carries the bottom lid and its tuck flap. Panels 1 and 3 each have a pair of tapered dust flaps, one at the top and one at the bottom, which fold in under the lids and keep the corners closed.
The 3 in box is the same strip cut in two. Part A has a glue flap, panel 1 (dust flaps) and panel 2 (top lid). Part B has its own glue flap, panel 3 (dust flaps) and panel 4 (bottom lid). Because the strip is split, there are two glue seams instead of one.
Each file is one closed cut path with the fold lines as separate gray lines. The cut layer passed our cardstock check, and the tuck flaps have rounded corners so they slide into the box without catching.
What you need
- Cardstock: one 12 x 12 sheet for the 2.7 in box, or two letter-size sheets for the 3 in box. Medium or heavy weight holds its shape best.
- Standard grip mat for medium cardstock, strong grip for heavy
- A machine scoring tool, or a bone folder and ruler
- Strong liquid craft glue or double-sided tape
- Optional: ribbon, a gift tag, tissue paper
How to cut it
- Upload the file through Upload, Upload Image. For the 3 in box, upload part A and part B. Our upload guide covers desktop and the phone app.
- Check the size. The one-piece box should read 11.35 x 9.66 in and each 3 in part 6.6 x 8.11 in. Cricut lists 11.5 x 11.5 in as the maximum cutting area on a 12 x 12 mat, so the one-piece box fits with a little room to spare.
- Set the fold lines to Score. Ungroup the design. In the Layers panel, Shift-click every gray fold line (12 on the one-piece box, 6 on each half), then open Operation and choose Score. Cricut’s Operation help page confirms you can change several layers at once this way.
- Attach the scores to the box. Select all the score lines and the box shape together and click Attach. Without this, Design Space can move the scores to a spot on the mat that has nothing to do with your box.
- Cut. Choose your cardstock in the Make screen and load the scoring tool when prompted. Check the mat preview: you should see one box shape with fold lines across it, and no fold lines drawn as cuts.
- Unload it face down. Flip the mat and peel it away from the cardstock, the way Cricut’s cardstock instructions suggest, so the flaps don’t curl.
Which scoring tool you can use depends on your machine. Cricut lists the Scoring Stylus for Explore and Maker machines, while the Scoring Wheel and Double Scoring Wheel work with Maker machines only; the double wheel is meant for heavier or coated stock. No scoring tool? Delete the fold lines and score by hand along a ruler, using the cut shape’s corners as your guide.
How to fold and glue the box
- Pre-fold every score. Fold each line toward the inside of the box, printed side out, and crease it with a bone folder.
- Glue the side seam. For the one-piece box, put glue on the glue flap, fold the strip into a square tube and press the flap to the inside of panel 4’s free edge. Hold it square while the glue grabs.
- For the 3 in box, join the halves. Part B’s glue flap goes inside the free edge of panel 2 on part A. Then fold the strip around and glue part A’s flap inside the free edge of panel 4 on part B. You’ll have a square tube with two seams, the same shape as the one-piece box.
- Close the bottom. Fold in the two bottom dust flaps from panels 1 and 3, then bring the lid from panel 4 over them and push its tuck flap down inside the box.
- Fill and close the top. Fold in the two top dust flaps, bring the lid from panel 2 down over them and tuck it in. Since the top lid hinges on panel 2 and the bottom lid on panel 4, the lids close from opposite sides, which is what makes it a reverse tuck.
Let the glue seams dry fully before you fill the box. A seam that’s still wet slides when you push the tuck flap in, and the box ends up out of square.
Sizes
| Version | Box | Cardstock |
|---|---|---|
| One piece | 2.7 in cube | One 12 x 12 sheet |
| Two parts | 3 in cube | Two letter-size (8.5 x 11) sheets |
| Two parts, enlarged | Up to about a 3.5 in cube | Two letter-size sheets; scale both parts by exactly the same amount |
The one-piece file is already close to the 11.5 in cut limit, so it can’t grow on a 12 x 12 mat. For a bigger box, enlarge the two-part version. You can also shrink either one, since a box has no fine detail to lose, but small tuck flaps get fiddly to fold, and the parts must always be scaled together with their score lines attached.
Ideas
Patterned scrapbook paper that’s printed on one side works well if you fold it pattern-side out. Kraft cardstock with a paper band and a tag looks good for the holidays; tie one of our Christmas gift tags to the ribbon. For party favors, the pillow box is another shape to try, and if the gift is a card, the gift card holder is made for it.
If the box won’t close cleanly
A lid that bows or a tuck that won’t stay in usually comes from folds that aren’t crisp or a side seam glued slightly off square. Re-crease the lid folds with a bone folder, and check the seam: the glue flap should sit fully inside, lined up with the panel edge. If a score landed off the fold on the cut piece, the score lines weren’t attached; our weld vs attach vs group guide explains why. On heavy cardstock that cracks along the folds, run a bone folder along each score a second time before folding.
Questions
What is a reverse tuck end box?
A box with a tuck-in lid at each end, hinged on opposite sides: the top lid folds down from the back panel and the bottom lid folds up from the front. It needs only one glue seam.
Can I cut a 3 inch box on letter-size cardstock?
Yes. The 3 in box comes in two parts, each 6.6 x 8.11 in, so each fits on its own letter-size sheet. You glue the two halves into one box.
How do I make the fold lines score in Design Space?
Ungroup the design, select all the fold lines, and change their Operation to Score. Then select the score lines with the box shape and click Attach so they stay in place.
What cardstock weight is best for a gift box?
Medium or heavy cardstock holds its shape best. Cricut classes 80 lb (216 gsm) as medium and 100 lb (270 gsm) as heavy, and suggests a strong grip mat for heavy stock.